Chapter 13
RSA
13.2 Analysis of RSA
13.3 Implementations of RSA
13.4 RSA in OpenSSL
13.4.1 RSA Key Generation in OpenSSL
13.4.2 RSA Signing in OpenSSL (Sender)
13.4.3 RSA Encryption in OpenSSL (Sender)
13.4.4 RSA Decryption in OpenSSL (Receiver)
13.4.5 RSA Verification in OpenSSL (Receiver)
13.4.6 RSA OpenSSL Exercises
13.5 RSA in Python
This chapter presents the RSA algorithm, as an example of public key cryptography.
Presentation slides that accompany this chapter can be downloaded in the following formats: slides only (PDF); slides with notes (PDF, ODP, PPTX).
13.1 RSA Algorithm
The Rivest Shamir Adleman cipher (RSA) is the most widely known public key cryptosystem.
- Created Ron Rivest, Adi Shamir and Len Adleman in 1978
- Formed RSA Security (company) in 1982 to commercialise products
- Most widely used public-key algorithm
- RSA is a block cipher: plaintext and ciphertext are integers
As we will see, the plaintext and ciphertext are integers. Any data can be represented in binary, and then split into blocks, where each block is taken as an input to RSA.
More information about Rivest, Shamir and Adleman is given in Chapter C.
- Step 1: Users generated RSA key pairs using RSA Key Generation Algorithm
- Step 2: Users exchange public key
- Step 3: Sender encrypts plaintext using RSA Encryption Algorithm
- Step 4: Receiver decrypts ciphertext using RSA Decryption Algorithm
The following will show the algorithms used in steps 1, 3 and 4. For now we assume the users can exchange public keys, noting that public keys do not need to be kept secret. For example, one method to exchange public keys over a network is to simply email the public key, unencrypted. It doesn’t matter if an attacker intercepts the public key, since, by definition, it is public to everyone.
Later we will see that the exchange of public keys is in fact harder than it seems.
Video: Introduction to RSA (4 min; Apr 2021)
Algorithm 13.1 (RSA Key Generation). Each user generates their own key pair
- Choose primes and
- Calculate
- Select :
- Find
The user keeps , and private. The values of and can be made public.
- Public key of user,
- Private key of user
Note that the private key includes both and , however the same is also included in the public key. So while is included in the private key, it is not actually private. This describes the conceptual view of the RSA public and private key. Implementations of RSA may store additional information in the keys, especially the private key.
Video: RSA Key Generation Algorithm (6 min; Apr 2021)
Exercise 13.1 (RSA Key Generation). Assume user chose the primes and . Find the public and private keys of user .
Solution 13.1 (RSA Key Generation). First calculate :
Now find using the property of Euler’s totient (Definition 5.8):
Next we choose a number relatively prime with 160, which will be . Or in other words, the greatest common divisor of and 160 is 1. There are multiple values possible for . We need to choose just one value, and at this point, any of those values. Let’s start small. As 160 is even, the even numbers will not be relatively prime with 160 so we can ignore them. What about 3? As 3 is prime and is not a divisor of 160, then 3 and 160 are relatively prime. So is a valid choice. There are other valid choices (e.g. 7, 9, 11, …), but we will go with 3.
Now we need to find the multiplicative inverse of 3 in mod 160. That is, find a such that:
The extended Euclidean algorithm can efficiently find a multiplicative inverse. But for now, as we are using small numbers, we can use trial and error. Note that the condition can be satisfied if we can find a that satisfies the following, for an integer :
Therefore we can try integers , and check if is divisible by 3.
Therefore .
We now have the RSA key pair of user :
Video: RSA Key Generation Example (14 min; Feb 2015)
Algorithm 13.2 (RSA Encryption and Decryption). Encryption of plaintext , where :
Decryption of ciphertext :
Note the conceptual simplicity of the encryption and decryption algorithms, compared to DES and AES. Also note that the decryption algorithm is in fact identical to encryption—it is only the variable names that have changed.
Video: RSA Encryption and Decryption (2 min; Apr 2021)
For a RSA to be usable it must meet the following usability and security requirements:
- Successful decryption: Possible to find values of , , such that for all
- Successful decryption: Encryption with one key of a key pair (e.g. PU) can only be successfully decrypted with the other key of the key pair (e.g. PR)
- Computational efficiency: Easy to calculate and for all values of
- Secure: Infeasible to determine or from known information , and
- Secure: Infeasible to determine or given known plaintext, e.g.
We will not show how RSA meets these requirements yet (it is covered in more depth later), but RSA does indeed meet these requirements.
The 1st requirement is that if a message is encrypted, then the decryption of the resulting ciphertext will produce the original message.
The 2nd requirement is that you can only use keys in the same key pair; using the wrong key will produce incorrect results.
The 3rd requirement is that users can easily perform the encrypt and decrypt operations. By “easily” we mean within reasonable time (i.e. seconds, not thousands of years).
The 4th requirement is that an attacker cannot find the private value or the message.
The 5th requirement is that, even if the attacker knows old plaintext values and the corresponding ciphertext (which was obtained using the same key pair), they should not be able to find or .
Looking at the algorithms it is not immediately obvious how the security requirements are met. That is because, for example, the encryption algorithm is an equation with 4 variables (, , , ), of which 3 are known to the attacker. Why can’t the attacker re-arrange the equation and find the value of the unknown variable ? We will see some analysis of the security later.
- RSA encryption uses one key of a key pair, while decryption must use the other key of that same key pair
- RSA works no matter the order of the keys
- RSA for confidentiality of messages
- Encrypt using the public key of receiver
- Decrypt using the private key of receiver
- RSA for authentication of messages
- Encrypt using the private key of the sender (called signing)
- Decrypt using the public key of the sender (called verification)
- In practice, RSA is primarily used for authentication, i.e. sign and verifying messages
Why does confidentiality work? Since the receiver is the only user that knows their private key, then they are the only user that can decrypt the ciphertext.
Why does authentication work? Since the sender is the only user that knows their private key, then they are the only user that can sign the message/plaintext. And the receiver can verify it came from that user if the signature decrypts successful with the sender’s public key.
Figures 13.1 and 13.2 illustrate how the key pair is used in RSA to provide either confidentiality or authentication. Note that such a feature (ability to use keys in either direction) is including in some, but not all, public key cryptography ciphers.
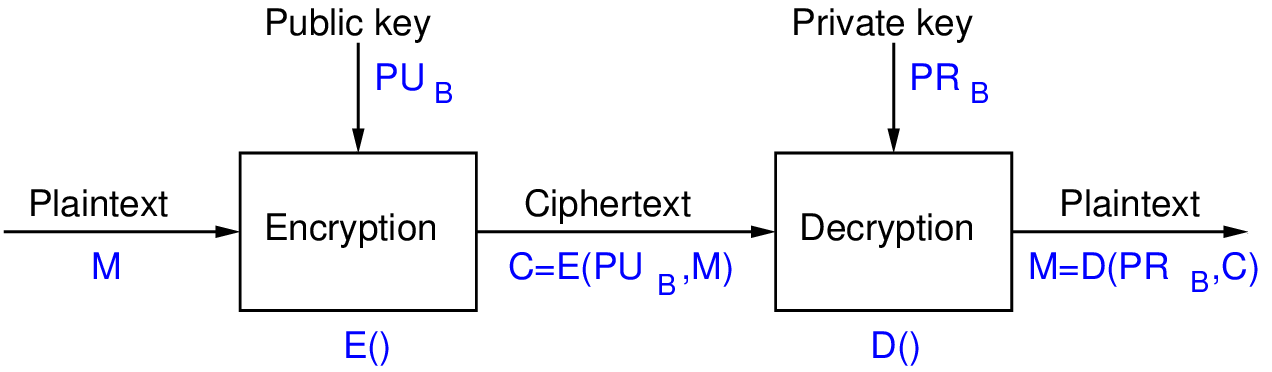
Figure 13.1 shows RSA used to provide confidentiality of the message . User A is on the left and user B is on the right. The operations E() and D() correspond to the encrypt and decrypt algorithms of RSA, respectively. User A encrypts the message using user B’s public key, . The ciphertext is sent to user B. User B then decrypts using their own private key, .
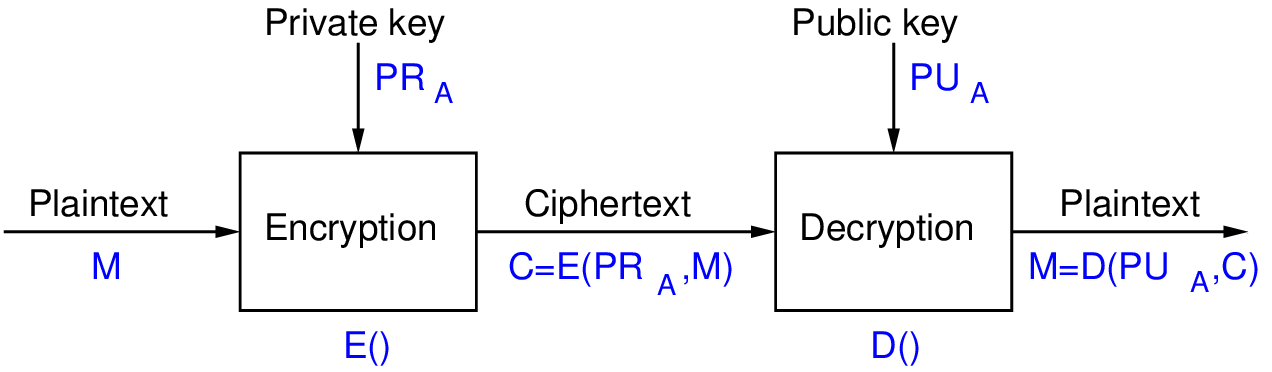
Figure 13.2 shows RSA used to provide authentication of the message . The operations E() and D() correspond to the encrypt and decrypt algorithms of RSA, respectively, however they are more commonly referred to as signing and verification operations, respectively. User A encrypts/signs the message using their own private key, . The ciphertext/signed message is sent to user B. User B then decrypts/verifies using user A’s public key, .
Exercise 13.2 (RSA Encryption for Confidentiality). Assume user wants to send a confidential message to user , where that message, is 8. Find the ciphertext that will send .
Solution 13.2 (RSA Encryption for Confidentiality). For confidentiality, the sender encrypts using the receiver’s public key. From the previous key generation exercise, the public key of user is . With , the RSA encryption algorithm can be applied:
Therefore the ciphertext is .
Video: RSA Encryption Example (11min; Feb 2015)
Exercise 13.3 (RSA Decryption for Confidentiality). Show that user successfully decrypts the ciphertext.
Solution 13.3 (RSA Decryption for Confidentiality). User receives the ciphertext, from , and decrypts using their own private key .
Be careful at this stage. Some calculators will approximate the exponentiation (the calculator applications in Ubuntu 18.08 and Windows 10 do not, but older desk calculators will). You may try an arbitrary precision calculator, such as bc (see Chapter 3). The output from the exponentiation using bc is:
138^107
92696267009151974112580966494142469075148237762435797813883675229744\
10315603725576855575549455980054411733018856229158449793951447981059\
64058537231504845445105996494390906329961481123710256232656386293889\
6109715508026034609979392
Then performing the mod gives:
138^107 % 187
8
Therefore user has successfully decrypted the ciphertext, obtaining the original plaintext, .
13.2 Analysis of RSA
We now analyse the design of RSA, identifying appropriate values to be used that lead to suitable security and performance.
- Encryption involves taking plaintext and raise to power
- Decryption involves taking previous value and raise to a different power
- Decryption must produce the original plaintext, that is:
- This is true of if and are relatively prime
- Choose primes and , and calculate:
Here we see why the key generation algorithm is designed as it is. Decryption will only work (that is, produce the original plaintext) if the top equation is true. Note that . So the condition is that if you take the plaintext and raise it to the power then the answer must be the original (in mod ). For this to be true, and must be chosen appropriately—it will not work for just any value of and . Using Euler’s theorem it can be shown that it will be true if and are multiplicative inverses of each other in mod .
Now we consider the guidelines for choosing values of parameters in RSA key generation.
- Note: modular exponentiation is slow when using large values
- Choosing
- Values such as 3, 17 and 65537 are popular: make exponentiation faster
- Small vulnerable to attack; solution is to add random padding to each
- Choosing
- Small vulnerable to attack
- But large makes decryption slow
- Choosing
and
- and must be very large primes
- Choose random odd number and test if its prime (probabilistic test)
As we saw in the exercise, key generation involves selecting values for , and (where influences the value of as it is the multiplicative inverse).
As is a public value, a small value can be selected (since a brute force is not relevant; the attacker already knows it) and in fact, many users can use the same value as each other. For example, OpenSSL defaults to using for all keypairs generated. That is, by default everyone using OpenSSL to generate keypairs will have the same value of . This value is small, meaning encryption is reasonable fast.
As is the multiplicative inverse of , a small means will be large. This is good, because must be kept private; large values are not subject to brute force attack. But it makes decryption slow, since it involves , which is often taking one very large number and raising to the power of another very large number . We will see later there are algorithms that can speed up the decryption process.
The primes and should be chosen randomly (again, they are private, so should be hard for an attacker to guess). A common approach is to choose a large odd number and then check if it is prime. There are primality testing algorithms that can either prove the number selected is prime, or give high confidence that it is prime (i.e. probabilistic test). When RSA is used for signatures—it’s most common use—probabilistic testing is sufficient (it is faster than testing for provable primes).
Now we look at why RSA is considered secure by considering the possible attacks on RSA.
- Brute-Force attack: choose large (but makes algorithm slower)
- Mathematical attacks:
- Factor into its two prime factors
- Determine directly, without determining or
- Determine directly, without determining
- Factoring is considered fastest approach; hence used as measure of RSA security
- Timing attacks: practical, but countermeasures easy to add (e.g. random delay). 2 to 10% performance penalty
- Chosen ciphertext attack: countermeasure is to use padding (Optimal Asymmetric Encryption Padding)
The three mathematical attacks require the attacker to solve computationally hard problems. That is, when large values are used,
Video: Analysis of RSA (6 min; Apr 2021)
Video: Avenues of attack on RSA (10 min; Feb 2015)
- Factoring into primes and is considered the easiest attack
- Some records by length of :
- 1991: 330 bits (100 digits)
- 2003: 576 bits (174 digits)
- 2005: 640 bits (193 digits)
- 2009: 768 bits (232 digits), operations, 2000 years on single core 2.2 GHz computer
- 2019: 795 bits (240 digits), 900 core years
- Improving at rate of 5–20 bits per year
- Typical length of : 1024 bits, 2048 bits, 4096 bits
In the 1990’s and 2000’s, the RSA Challenge tasked researchers with factoring integers of various sizes. The numbers reported on this slide are mainly from successful attempts at the RSA Challenge.
The rate of improvement of integer factorisation, varies depending on where you consider the starting year. In any case, RSA keys of 2048 bits are considered secure for the near future.
We don’t cover quantum computers and cryptography here. While it is important for the future, in 2018 the largest reported integer factored into primes using a quantum computer was 4088459, that is 22 bits. While in theory quantum computers will be able to make integer factorisation much easier (make RSA insecure), in practice there is a long way to go.
13.3 Implementations of RSA
We now consider implementation aspects of RSA, first looking at the recommend parameter values and then how implementations can improve performance.
- RSA Key length: 1024, 2048, 3072 or 4096 bits
- Refers to the length of
- 2048 and above are recommended
- and are chosen randomly; about half as many bits as
- is small, often constant; e.g. 65537
- is calculated; about same length as
- For detailed recommendations see NIST FIPS 186 Digital Signature Standard
As an example, with a RSA 1024 bit key, length of and will be about 512 bits, and the length of will be 1024 bits. could be 65537 which is 17 bits, and will be approximately 1024 bits.
FIPS 186 provides details of the implementation of RSA to meet US government standards. It includes specific algorithms to use and some recommended values. It also sets requirements for selecting random primes.
- Modular arithmetic, especially exponentiation, can be slow with very large numbers (1000’s of bits)
- Use properties of modular arithmetic to simplify calculations, e.g.
- Also Euler’s theorem and Chinese Remainder Theorem can simplify calculations
- Decryption is significantly slower than encryption since is very large
- Implementations of RSA often store and use intermediate values to speed up decryption
While there are methods to speed up decryption in RSA (see the next slide), it is still significantly slower than encryption in practice.
- Encryption:
- Decryption:
- Modulus, of length bits
- Public exponent,
- Private exponent,
- Prime1, , and Prime2,
- Exponent1,
- Exponent2,
- Coefficient,
- Private values:
- Public values:
We see the parameters used within OpenSSL. , , , and are normal. However , and are intermediate values introduced and stored as part of the private key. They are used to speed up the decryption calculation. The decryption algorithm is split into multiple steps using these intermediate values, such that it is significant faster than if using a single step. However the end result is still the same.
While you don’t need to know what the intermediate steps are, it is useful to know that these intermediate values exist, as you will see them when using RSA in practice (e.g. generating keys with OpenSSL).
13.4 RSA in OpenSSL
OpenSSL can be used to perform various operations with public key cryptography. Here we demonstrate basic usage of RSA.
To demonstrate RSA we use the scenario of user Alice on one computer (called node1) wishing to send a confidential and signed message to user Bob on another computer (called node2). This chapter has focused on using RSA for encryption (i.e. keeping the message confidential). However it is much more widely used for authentication or signing messages. This example includes signing; the concepts of signing and verification are discussed in Chapter 17.
We demonstrate the following operations for users:
- Create a RSA public/private key pair
- View and understand the parameters in the key pair
- Sign a message using their private key
- Encrypt a message using the recipients public key
- “Send” the signature and ciphertext to the recipient
13.4.1 RSA Key Generation in OpenSSL
Any user can generate their RSA key pair using the genpkey command. Note that in public key cryptography a key pair consists of a private key and public key. A user can distribute their public key to anyone, but keeps their private key to themselves. But they also need to store their own public key. So in practice, a user will have two files: a private key file, which contains their private key information and their public key information; and a public key file, which contains only their public key information. So in OpenSSL, when a private key is generated with genpkey, the public key information is also created.
To generate the private (and public key):
alice@node1:~$ openssl genpkey -algorithm RSA -pkeyopt rsa_keygen_bits:2048 -pkeyopt rsa_keygen_pubexp:3 -out privkey-alice.pem
alice@node1:~$ cat privkey-alice.pem
-----BEGIN PRIVATE KEY-----
MIIEvQIBADANBgkqhkiG9w0BAQEFAASCBKcwggSjAgEAAoIBAQCoXEAmbAuh9Nks
xtjIqgW8+MjaoRLWIKOpr54E7XcpzMSlNZggPBp0sLjfgvNFBPP7BrQms3qigwow
krML/fdwSFybigmuTCyJS/UIn3J5s70vUSpQ9M8oAU+6lvRdiByqR0zBnnWdR9B8
wW2/jM2Ng3yq51S6qR6LUs92jEzYATz1df8z+qcUL+navmOSLdA110qQpbKjEjI1
esJIkqrKlQiu1N0TQbexC9dNwtI79G79UR+YOR8CWJyYy/ZPeUrsr1mcSGL7facW
/aG2hh85/XdICm2PWgRySUu0M2rHdxL+AMukauYnlw4gddTO0cmUNyxKrVr5aQBP
hZxKtFV5AgEDAoIBAHA9gBmdXRajO3MvOzBxWSil2zxrYeQVwnEfvq3zpMaIgxjO
ZWrSvE3LJepXTNit9/yvIsR3pxcCBssMd11T+kra6GexW8mIHbDdTgW/oaZ303Tg
xuCjNMVWNScPTZOwExwviIEUTmjaiv3WSSpd3l5XqHHvjdHGFFzh36RdiI//vcSX
VHC76AkhkJ13aDEIUSQPMfE0OmI4dgK2sxH8BXAmAgc7YOksLF4t+tjaEoeUFQWP
SwFiGgVaU3wtmv1DoSwbAKSWs/9hDg3vgN8AFku3HCdBkpmpp2CYqoBWFDfUNW2q
TtB7IU2fwUOtoqiW8CegqVNf+X+KWT85mb1NnqMCgYEA3z2IhWyENYsHRrfbpISR
q3y5l5sgFM1ofRbPA5AZbZANY48jFPSeuKWJ1HhhZpwai+dcKf5R2w5V/4vpKqec
wFFGkXiOshkzty/67A75Uww/iewff0nj8ZwG7oLYl2PHu7iyyHiwbTj7N21Rapq+
iUHpd4RBpiOPoad4lD+CDWcCgYEAwREKex5clXt2SjavosQPqwMG6Au3RkJVBBqZ
sh1/NRJOohTYtsDgvH49CpAaT9R7w42eBRfUHOv7H9KeYyv3GNlARyzXouM4WtIb
dFkMqrwrQyEIkl73l8VdXXDZtQ/xByDOjPMBxvosNM2f9jcw2BbctslbvpaJ2Mk2
oW892h8CgYEAlNOwWPMCzlyvhHqSba22clMmZRIVYzOa/g80rQq7nmAI7QoXY02/
JcOxOFBA7xK8XUToG/7hPLQ5VQfwxxpogDYvC6W0drt3z3VR8rSmN11/sUgU/4aX


9mgEnwHlukKFJ9B3MFB1niX8z542RxHUW4FGT62BGW0Ka8T7DX+sCO8CgYEAgLYG
/L7oY6ekMXnKbIK1HKyvRV0k2YGOArxmdr5Uzgw0bA3lzytAfal+Bwq8NThSgl5p
WLqNaJ1SFTcUQh1PZeYq2h3lF0IlkeFnouYIcdLHghYFtun6ZS4+Pks7zgqgr2s0
XfdWhKbIIzO/+XogkA89zzDn1GRb5dt5wPTT5r8CgYEA29235n/Hw7wzOJyao6nO
3rjCZon4/V2G800VJF5hhAqCX5KDLd0KIMbaHaxsjW+n79CqZSUz3kZtpSXBXRJ7
SIXoCYljaoxdJ6SkVED6uFmcZ+3iwioxXzpIFIW0ZZj5S/WgBkPsioAJ6Cp5S8zh
BFB15UA+JWFH2SRabjXf0+4=
-----END PRIVATE KEY-----
The genpkey command takes an algorithm (RSA) as an option, and that algorithm may have further specific options. In this example we set the RSA key length to 2048 bits and used a public exponent of 3. Omitting these -pkeyopt options will revert to the default values. The private key (and public key information) is output to a file.
The private key file is encoded with Base64. To view the values:
alice@node1:~$ openssl pkey -in privkey-alice.pem -text
-----BEGIN PRIVATE KEY-----
MIIEvQIBADANBgkqhkiG9w0BAQEFAASCBKcwggSjAgEAAoIBAQCoXEAmbAuh9Nks
xtjIqgW8+MjaoRLWIKOpr54E7XcpzMSlNZggPBp0sLjfgvNFBPP7BrQms3qigwow
krML/fdwSFybigmuTCyJS/UIn3J5s70vUSpQ9M8oAU+6lvRdiByqR0zBnnWdR9B8
wW2/jM2Ng3yq51S6qR6LUs92jEzYATz1df8z+qcUL+navmOSLdA110qQpbKjEjI1
esJIkqrKlQiu1N0TQbexC9dNwtI79G79UR+YOR8CWJyYy/ZPeUrsr1mcSGL7facW
/aG2hh85/XdICm2PWgRySUu0M2rHdxL+AMukauYnlw4gddTO0cmUNyxKrVr5aQBP
hZxKtFV5AgEDAoIBAHA9gBmdXRajO3MvOzBxWSil2zxrYeQVwnEfvq3zpMaIgxjO
ZWrSvE3LJepXTNit9/yvIsR3pxcCBssMd11T+kra6GexW8mIHbDdTgW/oaZ303Tg
xuCjNMVWNScPTZOwExwviIEUTmjaiv3WSSpd3l5XqHHvjdHGFFzh36RdiI//vcSX
VHC76AkhkJ13aDEIUSQPMfE0OmI4dgK2sxH8BXAmAgc7YOksLF4t+tjaEoeUFQWP
SwFiGgVaU3wtmv1DoSwbAKSWs/9hDg3vgN8AFku3HCdBkpmpp2CYqoBWFDfUNW2q
TtB7IU2fwUOtoqiW8CegqVNf+X+KWT85mb1NnqMCgYEA3z2IhWyENYsHRrfbpISR
q3y5l5sgFM1ofRbPA5AZbZANY48jFPSeuKWJ1HhhZpwai+dcKf5R2w5V/4vpKqec
wFFGkXiOshkzty/67A75Uww/iewff0nj8ZwG7oLYl2PHu7iyyHiwbTj7N21Rapq+
iUHpd4RBpiOPoad4lD+CDWcCgYEAwREKex5clXt2SjavosQPqwMG6Au3RkJVBBqZ
sh1/NRJOohTYtsDgvH49CpAaT9R7w42eBRfUHOv7H9KeYyv3GNlARyzXouM4WtIb
dFkMqrwrQyEIkl73l8VdXXDZtQ/xByDOjPMBxvosNM2f9jcw2BbctslbvpaJ2Mk2
oW892h8CgYEAlNOwWPMCzlyvhHqSba22clMmZRIVYzOa/g80rQq7nmAI7QoXY02/
JcOxOFBA7xK8XUToG/7hPLQ5VQfwxxpogDYvC6W0drt3z3VR8rSmN11/sUgU/4aX
9mgEnwHlukKFJ9B3MFB1niX8z542RxHUW4FGT62BGW0Ka8T7DX+sCO8CgYEAgLYG
/L7oY6ekMXnKbIK1HKyvRV0k2YGOArxmdr5Uzgw0bA3lzytAfal+Bwq8NThSgl5p
WLqNaJ1SFTcUQh1PZeYq2h3lF0IlkeFnouYIcdLHghYFtun6ZS4+Pks7zgqgr2s0
XfdWhKbIIzO/+XogkA89zzDn1GRb5dt5wPTT5r8CgYEA29235n/Hw7wzOJyao6nO
3rjCZon4/V2G800VJF5hhAqCX5KDLd0KIMbaHaxsjW+n79CqZSUz3kZtpSXBXRJ7
SIXoCYljaoxdJ6SkVED6uFmcZ+3iwioxXzpIFIW0ZZj5S/WgBkPsioAJ6Cp5S8zh
BFB15UA+JWFH2SRabjXf0+4=
-----END PRIVATE KEY-----
Private-Key: (2048 bit)
modulus:
     00:a8:5c:40:26:6c:0b:a1:f4:d9:2c:c6:d8:c8:aa:
     05:bc:f8:c8:da:a1:12:d6:20:a3:a9:af:9e:04:ed:


     77:29:cc:c4:a5:35:98:20:3c:1a:74:b0:b8:df:82:
     f3:45:04:f3:fb:06:b4:26:b3:7a:a2:83:0a:30:92:
     b3:0b:fd:f7:70:48:5c:9b:8a:09:ae:4c:2c:89:4b:
     f5:08:9f:72:79:b3:bd:2f:51:2a:50:f4:cf:28:01:
     4f:ba:96:f4:5d:88:1c:aa:47:4c:c1:9e:75:9d:47:
     d0:7c:c1:6d:bf:8c:cd:8d:83:7c:aa:e7:54:ba:a9:
     1e:8b:52:cf:76:8c:4c:d8:01:3c:f5:75:ff:33:fa:
     a7:14:2f:e9:da:be:63:92:2d:d0:35:d7:4a:90:a5:
     b2:a3:12:32:35:7a:c2:48:92:aa:ca:95:08:ae:d4:
     dd:13:41:b7:b1:0b:d7:4d:c2:d2:3b:f4:6e:fd:51:
     1f:98:39:1f:02:58:9c:98:cb:f6:4f:79:4a:ec:af:
     59:9c:48:62:fb:7d:a7:16:fd:a1:b6:86:1f:39:fd:
     77:48:0a:6d:8f:5a:04:72:49:4b:b4:33:6a:c7:77:
     12:fe:00:cb:a4:6a:e6:27:97:0e:20:75:d4:ce:d1:
     c9:94:37:2c:4a:ad:5a:f9:69:00:4f:85:9c:4a:b4:
     55:79
publicExponent: 3 (0x3)
privateExponent:
     70:3d:80:19:9d:5d:16:a3:3b:73:2f:3b:30:71:59:
     28:a5:db:3c:6b:61:e4:15:c2:71:1f:be:ad:f3:a4:
     c6:88:83:18:ce:65:6a:d2:bc:4d:cb:25:ea:57:4c:
     d8:ad:f7:fc:af:22:c4:77:a7:17:02:06:cb:0c:77:
     5d:53:fa:4a:da:e8:67:b1:5b:c9:88:1d:b0:dd:4e:
     05:bf:a1:a6:77:d3:74:e0:c6:e0:a3:34:c5:56:35:
     27:0f:4d:93:b0:13:1c:2f:88:81:14:4e:68:da:8a:
     fd:d6:49:2a:5d:de:5e:57:a8:71:ef:8d:d1:c6:14:
     5c:e1:df:a4:5d:88:8f:ff:bd:c4:97:54:70:bb:e8:
     09:21:90:9d:77:68:31:08:51:24:0f:31:f1:34:3a:
     62:38:76:02:b6:b3:11:fc:05:70:26:02:07:3b:60:
     e9:2c:2c:5e:2d:fa:d8:da:12:87:94:15:05:8f:4b:
     01:62:1a:05:5a:53:7c:2d:9a:fd:43:a1:2c:1b:00:
     a4:96:b3:ff:61:0e:0d:ef:80:df:00:16:4b:b7:1c:
     27:41:92:99:a9:a7:60:98:aa:80:56:14:37:d4:35:
     6d:aa:4e:d0:7b:21:4d:9f:c1:43:ad:a2:a8:96:f0:
     27:a0:a9:53:5f:f9:7f:8a:59:3f:39:99:bd:4d:9e:
     a3
prime1:
     00:df:3d:88:85:6c:84:35:8b:07:46:b7:db:a4:84:
     91:ab:7c:b9:97:9b:20:14:cd:68:7d:16:cf:03:90:
     19:6d:90:0d:63:8f:23:14:f4:9e:b8:a5:89:d4:78:
     61:66:9c:1a:8b:e7:5c:29:fe:51:db:0e:55:ff:8b:
     e9:2a:a7:9c:c0:51:46:91:78:8e:b2:19:33:b7:2f:
     fa:ec:0e:f9:53:0c:3f:89:ec:1f:7f:49:e3:f1:9c:
     06:ee:82:d8:97:63:c7:bb:b8:b2:c8:78:b0:6d:38:
     fb:37:6d:51:6a:9a:be:89:41:e9:77:84:41:a6:23:
     8f:a1:a7:78:94:3f:82:0d:67
prime2:


     00:c1:11:0a:7b:1e:5c:95:7b:76:4a:36:af:a2:c4:
     0f:ab:03:06:e8:0b:b7:46:42:55:04:1a:99:b2:1d:
     7f:35:12:4e:a2:14:d8:b6:c0:e0:bc:7e:3d:0a:90:
     1a:4f:d4:7b:c3:8d:9e:05:17:d4:1c:eb:fb:1f:d2:
     9e:63:2b:f7:18:d9:40:47:2c:d7:a2:e3:38:5a:d2:
     1b:74:59:0c:aa:bc:2b:43:21:08:92:5e:f7:97:c5:
     5d:5d:70:d9:b5:0f:f1:07:20:ce:8c:f3:01:c6:fa:
     2c:34:cd:9f:f6:37:30:d8:16:dc:b6:c9:5b:be:96:
     89:d8:c9:36:a1:6f:3d:da:1f
exponent1:
     00:94:d3:b0:58:f3:02:ce:5c:af:84:7a:92:6d:ad:
     b6:72:53:26:65:12:15:63:33:9a:fe:0f:34:ad:0a:
     bb:9e:60:08:ed:0a:17:63:4d:bf:25:c3:b1:38:50:
     40:ef:12:bc:5d:44:e8:1b:fe:e1:3c:b4:39:55:07:
     f0:c7:1a:68:80:36:2f:0b:a5:b4:76:bb:77:cf:75:
     51:f2:b4:a6:37:5d:7f:b1:48:14:ff:86:97:f6:68:
     04:9f:01:e5:ba:42:85:27:d0:77:30:50:75:9e:25:
     fc:cf:9e:36:47:11:d4:5b:81:46:4f:ad:81:19:6d:
     0a:6b:c4:fb:0d:7f:ac:08:ef
exponent2:
     00:80:b6:06:fc:be:e8:63:a7:a4:31:79:ca:6c:82:
     b5:1c:ac:af:45:5d:24:d9:81:8e:02:bc:66:76:be:
     54:ce:0c:34:6c:0d:e5:cf:2b:40:7d:a9:7e:07:0a:
     bc:35:38:52:82:5e:69:58:ba:8d:68:9d:52:15:37:
     14:42:1d:4f:65:e6:2a:da:1d:e5:17:42:25:91:e1:
     67:a2:e6:08:71:d2:c7:82:16:05:b6:e9:fa:65:2e:
     3e:3e:4b:3b:ce:0a:a0:af:6b:34:5d:f7:56:84:a6:
     c8:23:33:bf:f9:7a:20:90:0f:3d:cf:30:e7:d4:64:
     5b:e5:db:79:c0:f4:d3:e6:bf
coefficient:
     00:db:dd:b7:e6:7f:c7:c3:bc:33:38:9c:9a:a3:a9:
     ce:de:b8:c2:66:89:f8:fd:5d:86:f3:4d:15:24:5e:
     61:84:0a:82:5f:92:83:2d:dd:0a:20:c6:da:1d:ac:
     6c:8d:6f:a7:ef:d0:aa:65:25:33:de:46:6d:a5:25:
     c1:5d:12:7b:48:85:e8:09:89:63:6a:8c:5d:27:a4:
     a4:54:40:fa:b8:59:9c:67:ed:e2:c2:2a:31:5f:3a:
     48:14:85:b4:65:98:f9:4b:f5:a0:06:43:ec:8a:80:
     09:e8:2a:79:4b:cc:e1:04:50:75:e5:40:3e:25:61:
     47:d9:24:5a:6e:35:df:d3:ee
An explanation of these values can be found in a lecture on Public Key Cryptography, specifically on slide 18.
To output just the public key to a file:
alice@node1:~$ openssl pkey -in privkey-alice.pem -out pubkey-alice.pem -pubout
alice@node1:~$ cat pubkey-alice.pem
-----BEGIN PUBLIC KEY-----
MIIBIDANBgkqhkiG9w0BAQEFAAOCAQ0AMIIBCAKCAQEAqFxAJmwLofTZLMbYyKoF


vPjI2qES1iCjqa+eBO13KczEpTWYIDwadLC434LzRQTz+wa0JrN6ooMKMJKzC/33
cEhcm4oJrkwsiUv1CJ9yebO9L1EqUPTPKAFPupb0XYgcqkdMwZ51nUfQfMFtv4zN
jYN8qudUuqkei1LPdoxM2AE89XX/M/qnFC/p2r5jki3QNddKkKWyoxIyNXrCSJKq
ypUIrtTdE0G3sQvXTcLSO/Ru/VEfmDkfAlicmMv2T3lK7K9ZnEhi+32nFv2htoYf
Of13SAptj1oEcklLtDNqx3cS/gDLpGrmJ5cOIHXUztHJlDcsSq1a+WkAT4WcSrRV
eQIBAw==
-----END PUBLIC KEY-----
Check by looking at the individual values. Only the public key values are included:
alice@node1:~$ openssl pkey -in pubkey-alice.pem -pubin -text
-----BEGIN PUBLIC KEY-----
MIIBIDANBgkqhkiG9w0BAQEFAAOCAQ0AMIIBCAKCAQEAqFxAJmwLofTZLMbYyKoF
vPjI2qES1iCjqa+eBO13KczEpTWYIDwadLC434LzRQTz+wa0JrN6ooMKMJKzC/33
cEhcm4oJrkwsiUv1CJ9yebO9L1EqUPTPKAFPupb0XYgcqkdMwZ51nUfQfMFtv4zN
jYN8qudUuqkei1LPdoxM2AE89XX/M/qnFC/p2r5jki3QNddKkKWyoxIyNXrCSJKq
ypUIrtTdE0G3sQvXTcLSO/Ru/VEfmDkfAlicmMv2T3lK7K9ZnEhi+32nFv2htoYf
Of13SAptj1oEcklLtDNqx3cS/gDLpGrmJ5cOIHXUztHJlDcsSq1a+WkAT4WcSrRV
eQIBAw==
-----END PUBLIC KEY-----
Public-Key: (2048 bit)
Modulus:
     00:a8:5c:40:26:6c:0b:a1:f4:d9:2c:c6:d8:c8:aa:
     05:bc:f8:c8:da:a1:12:d6:20:a3:a9:af:9e:04:ed:
     77:29:cc:c4:a5:35:98:20:3c:1a:74:b0:b8:df:82:
     f3:45:04:f3:fb:06:b4:26:b3:7a:a2:83:0a:30:92:
     b3:0b:fd:f7:70:48:5c:9b:8a:09:ae:4c:2c:89:4b:
     f5:08:9f:72:79:b3:bd:2f:51:2a:50:f4:cf:28:01:
     4f:ba:96:f4:5d:88:1c:aa:47:4c:c1:9e:75:9d:47:
     d0:7c:c1:6d:bf:8c:cd:8d:83:7c:aa:e7:54:ba:a9:
     1e:8b:52:cf:76:8c:4c:d8:01:3c:f5:75:ff:33:fa:
     a7:14:2f:e9:da:be:63:92:2d:d0:35:d7:4a:90:a5:
     b2:a3:12:32:35:7a:c2:48:92:aa:ca:95:08:ae:d4:
     dd:13:41:b7:b1:0b:d7:4d:c2:d2:3b:f4:6e:fd:51:
     1f:98:39:1f:02:58:9c:98:cb:f6:4f:79:4a:ec:af:
     59:9c:48:62:fb:7d:a7:16:fd:a1:b6:86:1f:39:fd:
     77:48:0a:6d:8f:5a:04:72:49:4b:b4:33:6a:c7:77:
     12:fe:00:cb:a4:6a:e6:27:97:0e:20:75:d4:ce:d1:
     c9:94:37:2c:4a:ad:5a:f9:69:00:4f:85:9c:4a:b4:
     55:79
Exponent: 3 (0x3)
13.4.2 RSA Signing in OpenSSL (Sender)
Now that Alice has her private and public key files, let’s create a text file containing the message to send to Bob:
alice@node1:~$ echo "This is my example message." > message-alice.txt
alice@node1:~$ cat message-alice.txt
This is my example message.
To sign the message you need to calculate its hash and then encrypt that hash using your private key. To create a hash of a message (without encrypting):
alice@node1:~$ openssl dgst -sha1 message-alice.txt
SHA1(message-alice.txt)= 064774b2fb550d8c1d7d39fa5ac5685e2f8b1ca6
OpenSSL has an option to calculate the hash and then sign it using a selected private key. The output will be a file containing the signature.
alice@node1:~$ openssl dgst -sha1 -sign privkey-alice.pem -out sign-alice.bin message-alice.txt
alice@node1:~$ ls -l
total 16
-rw-r--r-- 1 sgordon users   28 2012-03-04 15:14 message-alice.txt
-rw-r--r-- 1 sgordon users 1704 2012-03-04 14:58 privkey-alice.pem
-rw-r--r-- 1 sgordon users  451 2012-03-04 15:08 pubkey-alice.pem
-rw-r--r-- 1 sgordon users  256 2012-03-04 15:20 sign-alice.bin
13.4.3 RSA Encryption in OpenSSL (Sender)
To encrypt the message using RSA, use the recipients public key (this assumes the recipient, Bob, has already created and distributed their public key, using the same steps as above):
alice@node1:~$ openssl pkeyutl -encrypt -in message-alice.txt -pubin -inkey pubkey-bob.pem -out ciphertext-alice.bin
Note that direct RSA encryption should only be used on small files, with length less than the length of the key. If you want to encrypt large files then use symmetric key encryption. Two approaches to do this with OpenSSL: (1) generate a random key to be used with a symmetric cipher to encrypt the message and then encrypt the key with RSA; (2) use the smime operation, which combines RSA and a symmetric cipher to automate approach 1.
Now Alice sends the following to Bob:
- Ciphertext of the mesasge, ciphertext-alice.bin
- Signature of the message, sign-alice.bin
- Optionally, if she hasn’t done so in the past, her public key, public-alice.pem
13.4.4 RSA Decryption in OpenSSL (Receiver)
When Bob receive’s the two files from Alice, he needs to decrypt the ciphertext and verify the signature. Bob will need to use his RSA private/public key files, which were generated in the same way as for Alice, i.e. using genpkey.
To decrypt the received ciphertext:
bob@node2:~$ openssl pkeyutl -decrypt -in ciphertext-alice.bin -inkey privkey-bob.pem -out received-alice.txt
bob@node2:~$ cat received-alice.txt
This is my example message.
13.4.5 RSA Verification in OpenSSL (Receiver)
To verify the signature of a message:
bob@node2:~$ openssl dgst -sha1 -verify pubkey-alice.pem -signature sign-alice.bin received-alice.txt
Verified OK
The output messages shows the verification was successful.
13.4.6 RSA OpenSSL Exercises
Exercise 13.4 (RSA Key Generation). Generate your own RSA key pair using the OpenSSL genpkey command. Extract your public key and then exchange public key’s with another person (or if you want to do it on your own, generate a second key pair).
Solution 13.4 (RSA Key Generation). See the examples of genpkey and pkey commands in Section 13.4.1.
Exercise 13.5 (RSA Signing). Create a message in a file, sign that message using the dgst command, and then send the message and signature to another person.
Solution 13.5 (RSA Signing). Use a text editor, such as nano, to create a file containing a message. See the examples of dgst in Section 13.4.2.
Solution 13.6 (RSA Verification). See the example in Section 13.4.5.
Exercise 13.7 (RSA Performance Test). Using the OpenSSL speed command, compare the performance of RSA encrypt/sign operation against the RSA decrypt/verify operation.
Solution 13.7 (RSA Performance Test). You can select the rsa algorithm using the speed command, so that the performance test is only for RSA (and doesn’t include AES etc.).
13.5 RSA in Python
The Python Cryptography library includes asymmetric algorithms, including RSA. See the examples for RSA at: