Chapter 16
Attacks on Web Applications
16.1.1 Assumed Knowledge
16.1.2 Linux and Network Setup
16.2 Setup Demonstration Web Sites
16.2.1 Network Topology
16.2.2 Deploy the Web Sites
16.2.3 Domain Names
16.2.4 Setup Web Browsers
16.3 MyUni Grading Website
16.3.1 Access the Website
16.3.2 Users
16.3.3 Login System
16.3.4 Subjects and Grades
16.3.5 Desired Security Policy
16.3.6 Adding New Users and Subjects
16.4 Cookie Stealing Attack
16.5 Unvalidated Redirect Attack
16.6 SQL Injection Attack
16.7 CSRF Attack
16.8 Next Steps
File: nsl/webattacks.tex, r1670
Attacks on web applications are widespread in the Internet today, and often lead to other security attacks (e.g. release of confidential information such as passwords). Understanding how attacks work is beneficial to preventing and defending against such attacks. This chapter demonstrates several common web attacks on a fake website.
This chapter does not attempt to explain the attacks in detail, but rather shows how to setup a website to be attacked and demonstrates avenues for different attacks. Open Web Application Security Project (OWASP) is an organisation that provides lots of material about attacks against web sites, and how to avoid them. They produce a Top 10 list of web application security risks. You are highly recommended to read the OWASP Top 10 before attempting the attacks in this chapter. Also use OWASP to find more details about specific defences, including good web application development practices.
16.1 Prerequisites
16.1.1 Assumed Knowledge
This chapter assumes you have knowledge of:
- Basic operating system concepts, including users, passwords and file systems.
- Authentication, especially password-based authentication.
- Access control techniques, especially discretionary access control.
- Dynamic web applications, e.g. using HTML, processing engines such as PHP and databases.
- OWASP Top 10 web application security risks.
Basic Linux command line skills, as covered in Chapter 4, are assumed. You will need to be able to:
- View and edit files, e.g. with cat or nano.
- Perform operations on directories and files, including ls, cd, cp.
- Capture packets with tcpdump (Chapter 11)
- Use Lynx, a text based web browser (Section 5.3.2)
16.1.2 Linux and Network Setup
The demonstrations in this chapter use virtnet (Chapter 3), as it provides an easy method to setup the required computers and includes simple web applications to attack.
The required virtnet (Chapter 3) topology is:
While attacks could be performed on other computers, you would need to setup your own demo web applications. virtnet provides the demo web applications.
16.2 Setup Demonstration Web Sites
16.2.1 Network Topology
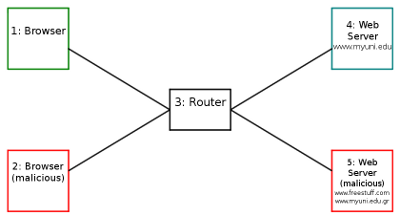
You must first deploy topology 7 in virtnet. This creates five nodes. We will use these nodes as follows (and illustrated in Figure 16.1).
- node1
- A user will use a web browser to access web servers. In some cases this will be a normal (non-malicious) user, and others they may be the attacker (malicious).
- node2
- Another web browser. Only needed in some attacks.
- node3
- Router connecting browsing computers to server computers. Packets can be captured on this node to observe the messages in attacks.
- node4
- The web server under attack. This hosts the MyUni website which is given the fake domain www.myuni.edu.
- node5
- A web server controlled by a malicious user. This server hosts two websites with domains www.freestuff.com and www.myuni.edu.gr.
In the following we will show how to deploy the websites, and explain their basic purpose.
16.2.2 Deploy the Web Sites
virtnet includes source code for several basic websites. Some of these include example data stored in databases. There are four different sites:
- A simple static web site with an index page. This is not used in this chapter.
- A universty grading system called MyUni and domain www.myuni.edu. This is a normal website not controlled by the attacker.
- A fake university grading system, pretending to be MyUni. This website is controlled by the attacker and has domain www.myuni.edu.gr.
- A simple website offering “free stuff” with domain www.freestuff.com. Again, this is controlled by the attacker.
To deploy the (real) MyUni, on node4 run the command:
network@node4:~$ sudo bash virtnet/bin/vn-deployrealmyuni
This command copies the necessary web files to /var/www and creates a MySQL database. It also starts the Apache web server and MySQL database server. Once complete, you should be able to access www.myuni.edu using a browser (e.g. lynx) on node4 and other nodes.
To deploy the fake MyUni and FreeStuff (both controlled by the attacker and running on node5), on node5 run the command:
network@node4:~$ sudo bash virtnet/bin/vn-deployfakemyuni
This sets up the two websites, so that www.myuni.edu.gr and www.freestuff.com should be accessible via a web browser.
(While it is not needed in this chapter, if you wish to use the simple static website instead of MyUni you can run sudo bash virtnet/bin/vn-deploywebindex on node4).
16.2.3 Domain Names
Rather than using the IP address of nodes in URLs, we will use some fake domain names just for this virtual network. These domains are set in the /etc/hosts file on each node (see Section 9.11.2 for an explanation of the file format). virtnet already has the mappings for each node so there is nothing for you to do.
If you want to view the mappings, or even changing the mappings, then edit the file /etc/hosts on every node where a client is used. Below is the output of the file.
network@node1:~$ cat /etc/hosts
127.0.0.1  localhost
127.0.1.1  node1

# The following lines are desirable for IPv6 capable hosts
::1     localhost ip6-localhost ip6-loopback
ff02::1 ip6-allnodes
ff02::2 ip6-allrouters

# Used for website demos
192.168.2.21  www.myuni.edu
192.168.2.22  www.freestuff.com
192.168.2.22  www.myuni.edu.gr
16.2.4 Setup Web Browsers
node1 will be the normal user using a web browser to access the web sites. node2 may be another (malicious) user using a browser. As the nodes do not have a GUI, there are two approaches to using a web browser:
- Using a text-only browser such as lynx. See Section 5.3.2 for an brief introduction to lynx.
- Use SSH tunnelling to allow a browser in the host to access virtual nodes. See Section 3.3.5 for how to setup tunnelling to use Firefox on your host computer.
Where possible, you are recommended to use lynx, as it is quicky to setup and use. However some attacks make use of images, and therefore a GUI browser on the host is needed.
Lynx and Cookies
By default, Lynx does not save cookies when you close and restart, i.e. you will always be prompted about accepting cookies. To temporarily change so that cookies are saved, you can use a different configuration. virtnet already includes a configuration file, lynx.cfg, on each node. You can use that configuration by passing the file name as a parameter:
network@node1:~$ lynx -cfg=lynx.cfg http://www.myuni.edu/grades/
If you look inside the file you will see:
SET_COOKIES:TRUE
ACCEPT_ALL_COOKIES:TRUE
PERSISTENT_COOKIES:TRUE
COOKIE_FILE:/home/network/.lynx_cookies
COOKIE_SAVE_FILE:/home/network/.lynx_cookies
PREFERRED_ENCODING:None
Of importance is that cookies are saved in a file called .lynx_cookies in your home directory when lynx closes, and then the next time lynx starts it reads the cookies from that file. Recall files starting with a dot (.) are hidden; use ls -a to list hidden files. You can view the contents of .lynx_cookies (as well as modify it) using a text editor, e.g.:
network@node1:~$ nano .lynx_cookies
16.3 MyUni Grading Website
The MyUni website has been created to allow demonstration of several attacks. While it has very limited functionality, a poor user interface and a variety of security flaws, it is sufficient for exploring different attacks.
The MyUni grading system resembles a basic university system that allows academics to enter grades for students and students to view their grades across multiple subjects. The website database is pre-populated with data, including students, one academic and grades for various subjects.
16.3.1 Access the Website
To access the MyUni grading system open the following Uniform Resource Locator (URL) in your browser:
http://www.myuni.edu/grades/
Note that the path grades/ is needed (otherwise you are taken to a web server index page). You can then explore different pages on the website.
16.3.2 Users
You need to login to the MyUni website. There are currently several users.
- Academic staff:
- Username: steve; Password: mysecret
- Students:
- Username: 5012345678; Password: student
- Username: 5000000000; Password: student
- Username: s1234567; Password: student7
- Username: s0000000; Password: student0
16.3.3 Login System
The operation of the login system in MyUni is as follows.
When a user visits the login page they enter a username and password in a HTML form. The values are submitted to the web server that then compares them with the values in the database. If the values match, then the user is logged in.
Of course once logged in, the user should not have to login for subsequent accesses. Therefore upon login, the web server creates a cookie and sends back to the web browser. On each subsequent access, the browser sends the cookie and the server checks that the values are correct for this user (without accessing the database). The cookie contains two values:
- Username
- Hash of username and a secret value
The secret value is common for the website. When the cookie is sent to the web server, the server checks if the hash value submitted is the same as the hash of the username and secret value. The idea is that if an attacker wanted to pretend to be a logged in user, although they could guess/find the username, they must also have the correct hash value, and for that, they need to know the secret value. But they don’t know the secret value because it is secret! (known only to the web server, not to any users). This implementation means that the server only needs to check the credentials in the database upon login, not upon each page access. It’s quite fast.
16.3.4 Subjects and Grades
The MyUni system stores grades/scores that a student has received for certain subjects. In the system, subjects are called courses, which is equivalent to a unit. Letter grades are used and there are two scales: A, B, C, D, F and HD, D, C, P, F. Subjects are identified by codes. Existing subjects include: its323, its335, css322, coit20262, coit20263, coit20264.
(The different letter scales and subject codes are due to demonstrations being performed at different universities).
16.3.5 Desired Security Policy
The grading system allows viewing/editing of scores according to the following policy:
- A user that is authenticated (logged in) can see the scores for either a selected course (by entering the course code) or for all of their courses (by leaving the course code blank).
- Non-authenticated users cannot see any scores.
- Authenticated users cannot see scores of other users, with the exception of (4).
- User steve (an academic member) can see the scores of any users. He is the special user that can enter the student ID of another user and see their scores.
16.3.6 Adding New Users and Subjects
While not necessary to perform the attacks, you can add new users/subjects for your own demonstration.
When the database for MyUni is created, an initial set of users and grades for courses are created. If you want to add more, then you can use SQL commands. To start MySQL client on node4:
network@node4:~$ mysql -u root -p webdemo_grades
The password is network.
Now in the MySQL prompt you can run queries. Below is sample output that illustrates how to insert a new user and grades.
network@node4:~$ mysql -u root -p webdemo_grades
Enter password: network
Reading table information for completion of table and column names
You can turn off this feature to get a quicker startup with -A

Welcome to the MySQL monitor.  Commands end with ; or \g.
Your MySQL connection id is 6
Server version: 5.7.17-0ubuntu0.16.04.1 (Ubuntu)

Copyright (c) 2000, 2016, Oracle and/or its affiliates. All rights reserved.

Oracle is a registered trademark of Oracle Corporation and/or its
affiliates. Other names may be trademarks of their respective
owners.

Type 'help;' or '\h' for help. Type '\c' to clear the current input statement.

mysql> show tables;
+--------------------------+
| Tables_in_webdemo_grades |
+--------------------------+
| coursegrades             |
| users                    |
+--------------------------+
2 rows in set (0.00 sec)

mysql>  insert into users values ('scott','s3cr3T');


Query OK, 1 row affected (0.01 sec)

mysql> select * from users;
+------------+----------+
| username   | password |
+------------+----------+
| 5000000000 | student  |
| 5012345678 | student  |
| s0000000   | student0 |
| s1234567   | student7 |
| scott      | s3cr3T   |
| steve      | mysecret |
+------------+----------+
6 rows in set (0.00 sec)

mysql> insert into coursegrades values ('scott','coit20262','F');
Query OK, 1 row affected (0.01 sec)

mysql> select * from coursegrades;
+------------+------------+-------+
| studentid  | coursecode | grade |
+------------+------------+-------+
| 5000000000 | css322     | D+    |
| 5000000000 | its335     | B+    |
| 5012345678 | css322     | B     |
| 5012345678 | its323     | C     |
| 5012345678 | its335     | A     |
| s0000000   | coit20262  | F     |
| s0000000   | coit20263  | C     |
| s1234567   | coit20262  | D     |
| s1234567   | coit20263  | D     |
| s1234567   | coit20264  | C     |
| scott      | coit20262  | F     |
+------------+------------+-------+
11 rows in set (0.00 sec)
16.4 Cookie Stealing Attack
The login mechanisms on the grading web site uses cookies to identify a logged in user. If a malicious user can find another users cookie (in particular the values of username and the id hash) then that malicious user can masquerade as another user.
If using lynx as the browser (on node1), press Ctrl-k to view cookies. Alternatively, when you exit lynx (q), the cookies are saved in the file /home/network/.lynx_cookies. Look in the file to see the values. Try copying the file to node2 and then start lynx on node2. You should be logged in as the user who was logged in on node1.
How does one user learn the cookie of another user? One simple method (which however may not be practical in some environments) is to capture packets on the network between the browser and server. In our virtual network, if you use tcpdump on node3 (the router) while node1 is browsing to the grading system web site, you should capture the HTTP request/response that contains the cookie. You can capture using the command:
network@node3:~$ sudo tcpdump -i eth1 -w file.pcap
This will save the packets in file.pcap, which you can then copy to your host computer and view in Wireshark. Alternatively, if you want to see the packets as they are captured (rather than using Wireshark), use tcpdump to show only HTTP packets, noting the command is all on one line:
network@node3:~$ sudo tcpdump -i eth1 -A -n 'tcp port 80 and (((ip[2:2] - ((ip[0]&0xf)<<2)) - ((tcp[12]&0xf0)>>2)) != 0)'
Video: Cookie Stealing Attack in virtnet (15 min; Mar 2017)
16.5 Unvalidated Redirect Attack
Some web sites have a “redirect” page, that redirects (or forwards) the user to another page or site. An example usage of a redirect maybe to prevent a warning before following links to external websites. For example, a government website may link to some commercial website. Rather than having a direct link link:
http://www.example.com/
the user may instead be redirected to a warning page via the link:
http://www.ministry.gov/redirect.php?url=www.example.com
The warning page may then display a message like We are not responsible for content on external sites and then (with another link or automatically after some time) forward the user to www.example.com.
There are different ways a malicious use could take advantage of a poorly implemented redirect page. One is a phishing attack. The malicious user creates an email or other web page that a normal user sees. Inside is a link like:
http://www.ministry.gov/redirect.php?url=www.ministry.gov.com
The user checks the domain in the link and notices it is a trusted domain, in this case www.ministry.gov. But they don’t look closely at the rest of the URL (in fact even if they do, they may not understand what it means). Therefore the click on the link.
The user expects to be taken to a page at the trusted domain www.ministry.gov, but the end result is they are redirected to another domain, presumably under control of the malicious user. The malicious user has several ways of taking advantage of this redirection …
You can try the redirection attack on the MyUni grades web site, as there is a page called redirect.php that takes a parameter called url. Try redirecting to a malicious site e.g. (noting the URL must be all on one line):
http://www.myuni.edu/grades/redirect.php?url=http://www.myuni.edu.gr/ades/login.php
Many users that see this link would identify the domain, www.myuni.edu as trusted, but in fact following the link takes them to an untrusted site (which as it turns out, has a similar domain, although it does not need to be).
What does http://www.myuni.edu.gr/ades/login.php do? Visit it and see. On node4 (under control of the malicious user), after you visit that URL, look in the file /tmp/stolenlogins.txt.
Video: Unvalidated Redirect Attack (11 min; Apr 2015)
16.6 SQL Injection Attack
An SQL injection attack involves injecting untrusted data into a system to perform unauthorised operations; this is done by taking advantage of SQL queries that many websites use to extract data. (Note that it doesn’t necessarily mean injected data into an Structured Query Language (SQL) database).
An SQL injection attack is possible due to poor programming by the web application developer; it is generally not due to bugs in the web server, processing language (e.g. PHP) or database (e.g. MySQL). Good programming techniques can help avoid SQL injection attacks.
This demo grading system is setup to allow an SQL injection attack. In particular, when logged in as one student, you can perform an SQL injection attack to view the scores of all other students (which according to the requirements, should not be allowed). How? When logged in as one student, try to view that students grades but set the course code to something like:
its335' OR '1'='1
You should see the grades of both students. To understand why this attack works, look at the SQL query created inside view.php.
Video: SQL Injection Attack in virtnet (11 min; Mar 2017)
16.7 CSRF Attack
This demo shows an example of a Cross Site Request Forgery (CSRF). Note that it doesn’t work in Lynx; you need to use Firefox or similar on your host, and then a proxy to the virtual node. Section 3.3.5 explains how to setup the proxy and browser.
When a user is accessing the grade system, once logged in a cookie is stored by the users browser so that each subsequent request is remembered. The cookie is sent by the browser to the server in each request to identify that this browser is a logged in user.
Now lets say a logged in user has permissions to perform some operations that other (non-logged in) users cannot. For example, on the grades system, user steve is allowed to edit grades of students; other users (whether logged in or not). In the grade system, the editing of grades is implemented by steve selecting a new grade, that new grade being sent via a URL parameter and the database updating the grade. The URL is structured as follows:
grades/updategrade.php?id=STUDENTID&course=CODE&newgrade=GRADE
where STUDENTID, CODE and GRADE are set to appropriate values.
The page updategrade.php also includes PHP code to check that the logged in user is steve. Therefore if another user tries to visit this page (in attempt to change a grade), an error will be returned and the grade will not be changed. How does the server know that the request is from the user steve? Based on the cookie sent.
Try it. Login as user 5012345678 and visit:
http://www.myuni.edu/grades/updategrade.php?id=5012345678&course=its335&newgrade=A
You should find that the grade cannot be upgraded (if it can, then there is a serious error in the PHP code at the server).
Then how does a user (other than steve) can a grade to change? By tricking steve, while logged in to the grade system, to visit some other website under the control of the malicious user, that contains a link to the updategrade.php page. A common way to do this is to create some normal website which has a hidden link. A hidden link can be created with an image of no size or iframe in HTML.
In this demo, there is a website on another server at:
http://www.freestuff.com/freestuff/
If you look close at the source of that website you will see an image included of 0 size. It is not actually an image however, but a link to the grades system to update a grade. If user steve is logged into the grade system, and then visits this other FreeStuff website, his browser will automatically send a request to the updategrade.php page on the grades system. The browser will include his cookie for 192.168.2.21, and so the server knows he is logged in and accordingly updates the grade. The results is that the malicious user has caused steve to update a grade with him knowing.
Video: Cross Site Request Forgery Attack (9 min; Apr 2015)
16.8 Next Steps
The previous sections provided instructions for setting up the virtual network and some fake websites on which common attacks can be performed. What to do next?
- Try the attacks, looking in the PHP/HTML source on the server and make sure you understand how they work
- Develop your own attacks on the demo web sites. See the OWASP Top 10 for suggestions for other attacks.
- Read the OWASP Top 10 and the many cheat sheets provided by OWASP to learn techniques for preventing these attacks.
The purpose of performing these web application attacks is to understand how they work so you can implement your web application to prevent such attacks. OWASP is an excellent source for further information on how to secure your web applications.