Chapter 3
Virtual Networking with Linux and VirtualBox
3.1.1 What is Virtual Networking?
3.1.2 Motivation for virtnet
3.1.3 How Does virtnet Work?
3.1.4 virtnet Terminology
3.1.5 History of virtnet
3.2 Getting Started
3.2.1 General Requirements
3.2.2 Installation
3.2.3 Creating Your First Topology
3.2.4 Creating a Different Topology
3.3 Using virtnet
3.3.1 Usernames and Passwords
3.3.2 Login to Nodes with VirtualBox
3.3.3 Login to Nodes with Secure Shell
3.3.4 Transferring Files
3.3.5 Using the Host Web Browser to Access a Guest Web Server
3.3.6 Shutting Down, Saving and Deleting Nodes
3.4 Troubleshooting virtnet
This chapter explains what virtual networking is, and shows you how to use virtnet, the virtual networking solution demonstrated in this book. If you want to get virtnet up and running quickly, jump directly to Section 3.2. If you don’t plan to use virtnet (e.g. you have your own physical test network, or have setup several Linux machines in your chosen virtualisation software) then you may skip this chapter.
3.1 Virtual Networking and virtnet
3.1.1 What is Virtual Networking?
A real computer network requires multiple pieces of hardware, such as computers (as hosts), switches, routers and cables. This hardware also requires space and power to run it, which can be inconvenient when getting started with networking at home. A virtual network involves using virtualisation software to run a network of (virtual) computers inside a single physical computer. The virtualisation software emulates the host computer hardware, switches and cables; you only need to setup the host and router software (e.g. operating system, network interfaces) for the virtual devices to communicate with each other. In theory, you can build and operate any network, all virtualised and running in your own computer (in practice, the size of the network will be limited by the performance of your computer).
3.1.2 Motivation for virtnet
Using a virtual network for learning networking and security has a number of advantages compared to using a real network:
- No need to obtain extra hardware, such as switches, cables, dedicated routers, additional computers; only a single computer is needed. This removes a significant barrier in practical networking tasks: cost.
- Every student can have their own dedicated network to themselves. No need for students to share networks. Note this is also a disadvantage in some cases, since multiple students collaborating in a single networks is also a valuable exercise.
- There is no impact on existing networks. For example, in a large shared physical lab network, experiments by some students may adversely impact those by other students. Also, there may be ethical/legal/policy issues when performing security tasks (e.g. intercepting the traffic of other users). In a virtual network, all traffic is contained within that network, which in turn is on a single students’ computer.
- Ability to produce identical network configurations across students, return to existing networks at a later date (without having to pack away equipment), and take snapshots of computers at any time. With a good initial setup, virtualisation software can allow you to create and save a network in the same manner as you can create and save a file with a word processor.
Note that in a virtual network the software used (operating system, network servers, applications) is the same as that used in a real network. Students gain real experience with software, which may not be the case if using a simulation environment.
Of course a virtual network does not replace the benefits gained from plugging in cables, configuring switches and setting up real hardware. Using a virtual network hides many of the hardware details. However it does let students focus on the networking and security applications, rather than setting up the network.
Performance is a major limitation of virtual networks. As there will be multiple, full virtual computers running on a single real computer, the number of virtual computers will be limited by the Central Processing Unit (CPU) and memory of the host computer. Virtual networks with several nodes can easily be implemented, while in some instances 20-50 nodes may be possible. But generally virtual networking is not suitable to large networks (10’s of nodes or more), especially using the approach in this book.
For my teaching of networking and security other requirements motivated the development of a specialised virtual networking solution:
- Almost no budget for equipment, including software licenses. Therefore a solution that used free, open source software was preferable.
- The virtual network would need to run mainly on student’s personal computer, primarily laptops. This meant supporting different operating systems (Windows, macOS) and requiring few hardware resources (4GB of Random Access Memory (RAM)).
- Little time was available for teaching the virtualisation software. The solution needed to be such that students could quickly get started on the networking or security tasks.
My approach to virtual networking was to use VirtualBox as the virtualisation software (as it is free, and runs on Windows, macOS and Linux), Linux as the guest operating system (for various reasons—see Chapter 2—including it requiring few resources and being free), and providing clear steps for quickly building the virtual network. Soon those clear steps became automated via a set of scripts, so students could download the scripts and a single base virtual machine, and within 5 minutes have a virtual network automatically deployed. This solution is referred to as virtnet.
3.1.3 How Does virtnet Work?
virtnet is a collection of software used to quickly create a virtual network. The software includes:
- VirtualBox virtualisation software
- Ubuntu Linux as the guest operating system
- A set of scripts that when run, automatically create multiple Linux guest machines connected in a desired network topology.
The virtnet scripts are rather simple (multiple files, usually 10’s of lines of code). They have two main purposes:
- Using the VirtualBox command line interface (VBoxManage), they clone a base Linux guest image as many times as needed for the desired network topology. All of the new guests, referred to as nodes, have the appropriate VirtualBox settings applied (e.g. interfaces enabled). Currently there are two versions of this set of scripts: Bash shell scripts that run on Linux or macOS hosts, or Windows batch scripts. They are run on the host.
- Once the guest nodes are running, the scripts setup the network interfaces (i.e. IP addresses) and routing where necessary. These scripts are are Linux Bash shell scripts and are run on each Linux guest.
The general idea is that a student will:
- Download the base Linux virtual machine image and virtnet scripts
- Add the base machine to VirtualBox
- Run the script for the desired topology
- Once nodes in the topology are created, run a script on each of them to finalise the configuration.
Ideally, the last two steps could be joined: that is, the user only runs a single script that creates the topology and configures the individual machines. The current approach is a compromise to cater for the different host computers that virtnet runs on (including Windows lab computers on which users do not have administrator access). Section 3.1.5 explains the development of virtnet over time and some of the reasons for the current design.
3.1.4 virtnet Terminology
In virtnet, and the rest of the book, we use the following terminology:
- virtnet
- collection of software, including VirtualBox, Linux virtual machine image, and scripts, for automatically creating a virtual network.
- host
- the real, physical computer, e.g. Windows may be the host operating system and your laptop is the host computer or machine.
- guest
- the virtual computer, i.e. running Linux operating system within VirtualBox.
- image
- an entire guest machine, often stored as a compressed file. Also referred to as a virtual machine.
- base
- the provided Linux image that will be cloned by virtnet. While the base image is downloaded and added to VirtualBox, it should not be run manually. It is only used by the scripts to create clones (copies).
- node
- Each of the Linux guests created by virtnet are referred to as nodes in a specific topology. They are numbered sequentially, e.g. node1, node2, node3, …. In VirtualBox you can run the nodes (but not the base).
- topology
- a specific arrangement of guest machines or nodes to create a virtual network. In virtnet the specific topologies are numbered, and you can create a topology by specifying it’s number. You can see all current topologies, and download the corresponding scripts, at https://sandilands.info/virtnet/topologies.
3.1.5 History of virtnet
The novel part of virtnet is the set of scripts that configure VirtualBox and the subsequent Linux guest images. Initially there were no scripts, but instead just a set of instructions for manually cloning the images and configuring the network. After going through the steps a few times (and asking students to do the same), I soon realised and possibility to automate many of the steps.
The original virtnet scripts, created in 2013, required the user to do the following:
- download a base virtual machine and add it to VirtualBox;
- install Subversion (SVN) client software. On Windows this had to be done within Cygwin (which also needed installing);
- use Subversion to checkout (download) the virtnet scripts;
- make a few configuration changes, especially on Windows;
- run a single virtnet script, such as vn-createtopology 5 that automatically cloned the base image and configured each Linux guest.
This approach required a bit of work in the initial once-off setup (installing Subversion, configuring some Windows paths), once completed it was very efficient at creating a new topology since the user just runs a single command which results in all nodes being cloned and configured.
In 2016, when trialling virtnet in a new university, the computer labs had restrictions that made it difficult for students to install Subversion and Cygwin on Windows. Therefore it was split into two parts: one that created cloned the base image and create the nodes, and the other that configured the Linux nodes internally. The disadvantage was that users had to manually run a script inside every node to configure it. While this was a step backwards in usability, it was necessary to allow virtnet to run in the Windows computer labs.
The base Linux image has been updated over time, originally starting as Ubuntu 12.04, and in 2019 being Ubuntu 16.04. In the future this is likely to be updated, as well as minor changes to the scripts. You are recommended to download the latest version from https://sandilands.info/virtnet/ or other source if directed by your lecturer.
As of 2019, there is a version of virtnet that works in Microsoft Azure cloud. That is, rather than using VirtualBox as the virtualisation software it uses Azure. The Linux nodes are created and accessed in Azure, allowing you to perform all tasks in the cloud, rather than on your own computer. While it is in it’s early stages, once completed, this may allow students to perform hands on networking and security tasks, unlimited by their personal computer capabilities and with very minimal setup.
3.2 Getting Started
3.2.1 General Requirements
Software Requirements
To use virtnet you need the following software/files:
- VirtualBox. This is free software available for Windows, macOS and Linux. Generally the latest version should be downloaded and installed.
- Base image for virtnet. This is a free download (about 450 MB) and consists of a VirtualBox image of a Linux operating system. Your lecturer may point you to a specific image or download site.
- virtnet scripts. This is a free download (less than 1 MB) and consists of a zip archive of all Windows and Linux/macOS scripts needed.
Other recommended software for Windows hosts is: PuTTY and FileZilla (or WinSCP). These are free to download and use. The equivalent applications for Linux/macOS hosts is normally already install (specifically, ssh and scp).
Hardware Requirements
The performance of VirtualBox running multiple guest machines depends primarily on the CPU and RAM of your host computer. Most CPUs released in the past 3 or 4 years should be sufficient to run a network with multiple nodes. The recommended RAM is 8 GB. With 4 GB you should be able to run small topologies (3 or 4 nodes). A solid state drive is beneficial for performance, but not necessary. Each node uses about 0.5 GB of disk space, so if you have 10GB of free space you should be able to create almost any topology.
A key feature that impacts on performance of using any virtualisation software is hardware-assisted CPU virtualisation. For Intel processes this feature is called VT-x and for AMD it is AMD-V. Most desktop/laptop CPUs released in the past years support this feature, however there may be some with it disabled, or even worse for you, not supported. There are different ways to check and enable CPU virtualisation, often depending on operating system and motherboard manufacturer. To check it is probably easiest to perform a web search for “enable VT-x lenovo” or “enable AMD-V dell” or similar depending on your CPU and computer manufacturer. There is a high chance your CPU already has it enabled, however if you do need to enable it the result from your web search will point to settings in your BIOS.
In summary, if your computer is less than 4 years old, then it is highly likely that it has sufficient hardware to complete all of the tasks in this book within virtnet.
3.2.2 Installation
To get started with virtnet, no matter what your host operating system, complete the following steps:
- Download and install VirtualBox.
- Download and unzip base.zip.
- Download and unzip vn-scripts.zip.
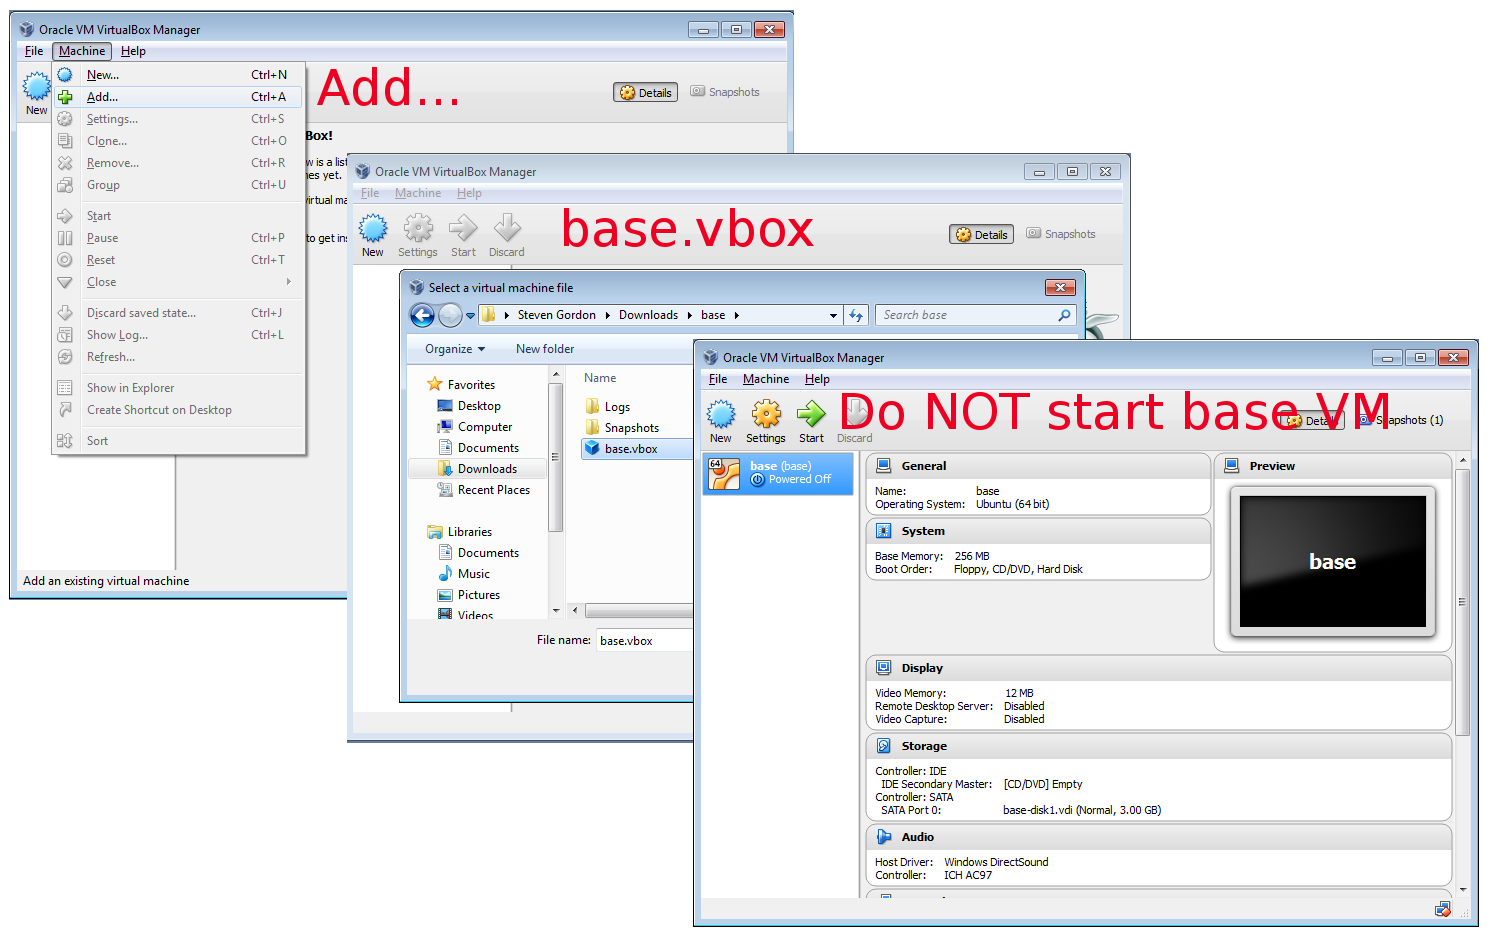
- Open VirtualBox and from the ”Machine” menu select ”Add...”. Then browse to
the folder where base.zip was extracted and select base.vbox. This should create a
virtual machine in VirtualBox called base. Do NOT start the base VM. Figure 3.1
shows a screenshot of these steps.
Now you use the downloaded scripts to create a topology of your choice, as shown in the next section.
Video: Setting Up a Virtual Linux Network on Windows (17 min; Feb 2017)
3.2.3 Creating Your First Topology
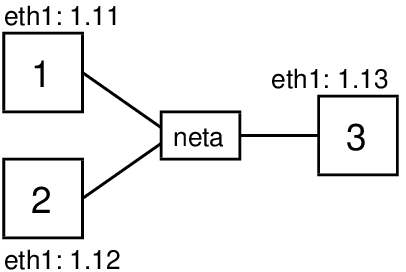
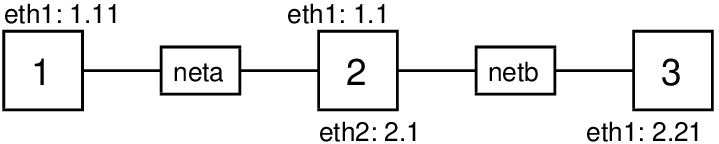
Choose the topology number that you want to create. Topology 1 contains just a single node (not really a network) and is the fastest for testing that virtnet works. Topology 3 contains three nodes connected in a single Local Area Network (LAN). Topology 5 contains three nodes, one of which is a router. Figure 3.2, 3.3 and 3.4 shows topologies 1, 3 and 5, respectively. All available topologies (there are more than 25) are shown at https://sandilands.info/virtnet/topologies.

The process for creating your selected topology differs depending on your host operating system.
Host: Windows
Navigate to the folder where vn-scripts.zip was extracted and you should see multiple vn-topology….cmd batch files. Double-click on the batch file for your selected topology.
Host: Linux or macOS
Open a Terminal and change to the directory where vn-scripts.zip was extracted. Running the ls command should show you multiple vn-topology….sh script files. Enter the following command for your selected topology (replacing XX with your topology number):
$ bash vn-topologyXX.sh
You will be shown a short message about deleting existing nodes (see Section 3.2.4 for how to delete the nodes) and be asked to press any key to continue:
You are about to clone the "base" VM to node(s). Make sure you
have deleted any existing nodes before continuing. In the
VirtualBox GUI, if you have node1, node2, ... then right-click
on them and select "Remove..." and then "Delete all files".
They need to be deleted before continuing.
Press any key to continue...
VirtualBox will then clone the base image to create one or more node images (depending on your selected topology). You will see a status message and be prompted to press any key to continue when complete. Below is an example of creating topology 5, which contains three nodes:
... 0%...10%...20%...30%...40%...50%...60%...70%...80%...90%...100%
Machine has been successfully cloned as "node1"
... 0%...10%...20%...30%...40%...50%...60%...70%...80%...90%...100%
Machine has been successfully cloned as "node2"
... 0%...10%...20%...30%...40%...50%...60%...70%...80%...90%...100%
Machine has been successfully cloned as "node3"
Press any key to continue...
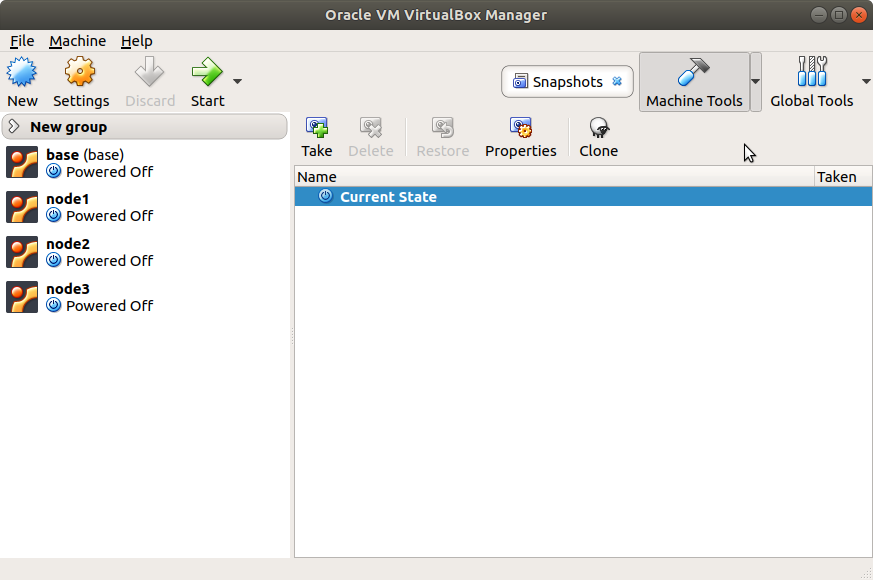
At this stage, even though the script is still running, you should see the new nodes created in VirtualBox. Figure 3.5 shows an example with three nodes in VirtualBox.
Next you will be shown instructions for how to proceed.
You should now have the following new VMs in VirtualBox:
    node1 node2 node3
If not, then make sure you deleted an OLD node1 VMs before
running this command.
You should now do the following for each node created:
    1. Start "node1" in VirtualBox
    2. Login with username "network" and password "network"
    3. Run the command:
       sudo bash virtnet/bin/vn-deploynode 5 1
    4. Repeat steps 1, 2 and 3 for node2, but with command:
       sudo bash virtnet/bin/vn-deploynode 5 2
    5. Repeat steps 1, 2 and 3 for node3, but with command:
       sudo bash virtnet/bin/vn-deploynode 5 3
Perform the above steps now. Once completed, press any key to quit.
Press any key to continue...
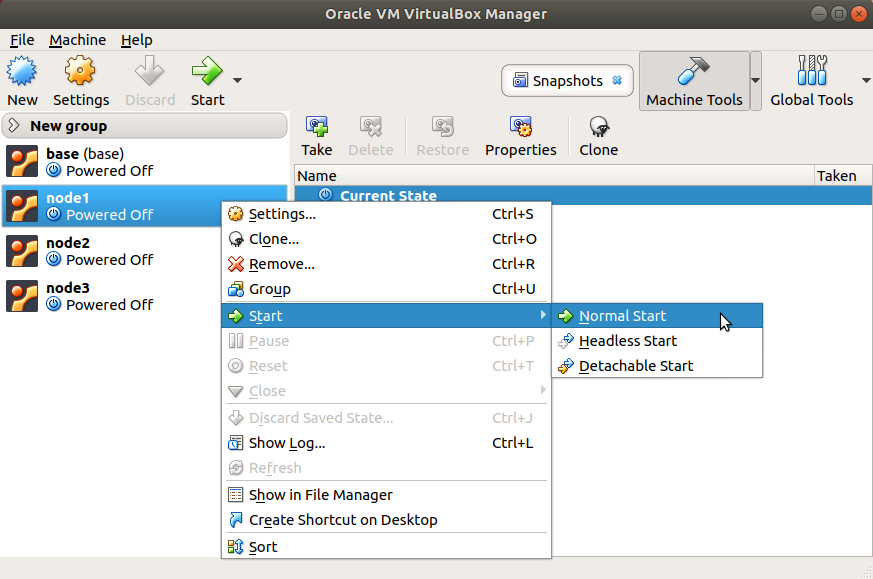
Follow the instructions in the message, i.e. starting each node, logging in, and running the vn-deploynode script with the topology number and node number as parameters. Figure 3.6 shows a screenshot of how to start a node in VirtualBox, while Figure 3.7 shows a screenshot of deploying three nodes when topology 5 is used.

Once each node has been deployed (by running the vn-deploynode script) and rebooted (sudo reboot), they are ready to be used (Section 3.3).
3.2.4 Creating a Different Topology
Creating a topology in virtnet simply creates and deploys multiple nodes in VirtualBox. If you want to create a new topology (or re-create an existing one) then the best approach is to delete all the existing nodes and execute the chosen vn-topologyXX.cmd file (or vn-topologyXX.sh file in the case of Linux/macOS).
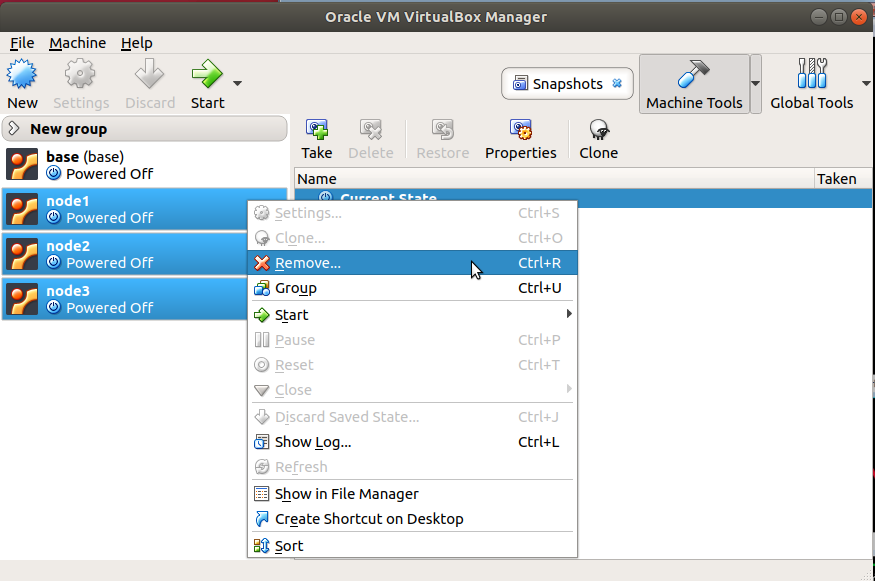
Importantly when deleting nodes from VirtualBox you must select “Delete all files”. After deleting the files associated with old nodes you can then create a new topology. Figures 3.8 and 3.9 show the steps for removing all files.

If you do want to keep nodes from an old topology you must manually rename them first. For example, change the name of node1 in VirtualBox to something else such as oldnode1.
3.3 Using virtnet
3.3.1 Usernames and Passwords
Every node is created with a user network with password network. Yes, the username and password are the same, and the password is the same on all nodes. In fact the password network is used for all other services by default. For example, the root user has password network and the MySQL database root user has password network. This is obviously not very secure, but remember the purpose of virtnet is that the nodes are only running on your computer and should not be accessible by anyone outside of your computer. And as the nodes are for learning, and may be deleted/re-created quite frequently, they should not be used for storing any important data.
3.3.2 Login to Nodes with VirtualBox
Once virtnet is setup on your host computer, open VirtualBox, select a node (e.g. node1) and start it in VirtualBox. The Linux operating system should boot and eventually prompt for a username and then password (remember: network for both).
You can start multiple nodes within VirtualBox, login to each, and then starting using them for tasks. The remainder of this book demonstrates tasks you can perform with virtnet.
3.3.3 Login to Nodes with Secure Shell
Logging in to each node with VirtualBox is sufficient. However sometimes the VirtualBox interface is not very convenient to use. It is difficult to resize the window/text, hard to copy-and-paste and you are stuck with the same colour scheme for each window.
Each node has a SSH server running, and has port forwarding enabled allowing software on the host to connect to the SSH server on the node. As a result we can use third-party software on the host to login to each node, and then take advantage of the convenient features of that third-party software. On Windows, the third-party software is the freely available PuTTY SSH client. On Linux and Mac hosts, the built-in terminal application includes a command-line SSH client.
Node Addresses with Port Forwarding
Before showing how to connect from a host SSH client to a node, take note of the addressing scheme used. Note that this is different from the IP addresses used within the nodes. To SSH into a node you use the localhost IP address as the destination (127.0.0.1) and a port number starting with 22 and followed by the node number with a leading 0.
- node1
- 127.0.0.1 and port 2201
- node2
- 127.0.0.1 and port 2202
- node3
- 127.0.0.1 and port 2203
- node4
- 127.0.0.1 and port 2204
- node5
- 127.0.0.1 and port 2205
- node6
- 127.0.0.1 and port 2206
- node7
- 127.0.0.1 and port 2207
- node8
- …
Windows Host: PuTTY
Download and install PuTTY. This is free open-source software, and valuable to have installed on any Windows host to remotely access servers.
Once installed, open PuTTY, set the Hostname to 127.0.0.1 and the Port to that for the respective node, e.g. 2201 for node1. Press the Open button to connect. On your first connection you may be presented with a security warning which you will need to say Yes to. Then you should be connected to the node and can login with the normal username and password.
You can open multiple instances of PuTTY to connect to different nodes. You can also configure PuTTY to suit your preferences (e.g. change font, copy-and-paste methods). To find out how, explore the settings in the PuTTY Configuration window and/or read the PuTTY manual.
Video: PuTTY to Connect to Ubuntu in VirtualBox (6 min; Feb 2018)
Linux or macOS Host: ssh
Open up a terminal in your host system. This is usually the application called Terminal in Linux or macOS. You then need to use the ssh command to login to a node. Use the -l option to specify the network username and the -p option to specify the port of the node, e.g. 2201. The server IP address is 127.0.0.1.
yourname@host:~$ ssh -l network -p 2201 127.0.0.1
On your first connection you may be presented with a security warning which you will need to say Yes to. Then you should be connected to the node and can login with the normal password.
3.3.4 Transferring Files
If you have files on a node in VirtualBox that you want to access in your host computer (e.g. Windows), you must use a SSH client to copy to files. Different SSH clients exist for different host operating systems.
Windows Host: FileZilla
On Windows hosts, you should install FileZilla or WinSCP, both free software with similar functionality. Then start FileZilla (or WinSCP) and connect to the server with the following parameters:
- Server/destination IP address
- 127.0.0.1
- Port number
- 2201 (for node1), 2202 (for node2), 2203 (for node3), and so on
- Protocol
- SFTP
- Username
- network
- Password
- network
Once connected you can upload/download files between the Linux node in VirtualBox and your real Windows computer. Figure 3.10 and 3.11 show setup of connections for FileZilla and WinSCP, respectively.
Screenshot of FileZilla to be added.
Screenshot of WinSCP to be added.
Video: Copying Files from Linux Guest to Windows Host with virtnet (8 min; Feb 2017)
Linux or macOS Host: scp
Open up a terminal in your host system. You then need to use the scp command to copy files to/from a node.
An example of copying the file nodefile.txt from the home directory on the node to your current directory on the host is below. The -P option is used to specify the port of the node, e.g. 2201. You must specify the full path of the source file, e.g. /home/network/nodefile.txt, and carefully note that there is a dot (.) at the end to specify the destination is “this current directory” on the host.
yourname@host:~$ scp -P 2201 network@127.0.0.1:/home/network/nodefile.txt .
Copying files from host to guest node is similar, as shown below.
yourname@host:~$ scp -P 2201 hostfile.txt network@127.0.0.1:/home/network/
3.3.5 Using the Host Web Browser to Access a Guest Web Server
The default setup of virtnet uses only command line access on the guests. There is no GUI or window manager on the guests. That makes using a web browser on a guest difficult: you are restricted to a terminal based text browser like Lynx (see Section 5.3.2). If you want to run a full web browser, like Firefox, on a guest then a full desktop environment needs to be installed on that guest. This takes up a lot of disk space and may also require more RAM for the guest. An alternative is to use the web browser on your host to access the web servers on your guests. It involves SOCKS tunnelling. Lets go straight into how to do it, with an explanation of how it works later.
On your host, connect to the guest using Secure Shell and a special tunnelling option. With ssh on the command line in Linux/macOS, this is performed using the -N and -D options:
yourname@host:~$ ssh -ND 3333 -p 2201 -l network localhost
The parameter values are:
- 3333 is an example port to be used for tunnelling. You can use almost any value higher than 1024, so long as it is not in use by other applications. Trying a random 4 digit number should be successful.
- 2201 is the port used by the SSH server on node1. This is the node you want to act as the client. If you want node2 to act as a client, use 2202, and so on (see Section 3.3.3).
- network is the user name for the node. The password will also be network in virtnet.
- localhost refers to this computer, since the node is running on VirtualBox on this computer. Alternatively you can use 127.0.0.1.
After entering the password there will be no visual response—leave this terminal open.
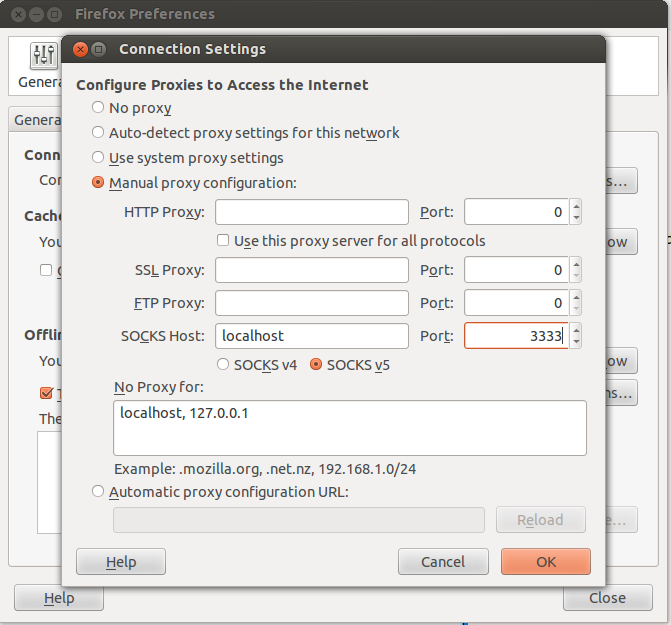
Now in your web browser preferences/settings, you need to enable proxying specifically using SOCKS. In Ubuntu Firefox, go to Edit menu and select Preferences. From the Advanced icon select the Network tab and press the Settings button. This lets you to set a proxy. Choose Manual proxy configuration and set the SOCKS Host to localhost and the Port to 3333 (or whatever you selected when starting ssh with the -ND option). It should look similar to Figure 3.12.
Now your host web browser will connect to the Secure Shell (SSH) client on the host, which in turn is connected to the SSH server on the guest. All of your host web browser traffic will go via the guest. In your web browser address bar, type in the IP address of the node running the web server, e.g. 192.168.2.21. You should see the web page offered by that guests web server.
This should work with most host operating systems and browsers, so long as the browser supports SOCKS proxies. If using Windows, since ssh is not available on the command line, you need to use PuTTY. Digital Ocean has instructions on using PuTTY for the SOCKS tunnelling.
3.3.6 Shutting Down, Saving and Deleting Nodes
When you have finished a lab or day, the best approach is to Close the node in VirtualBox and Save State. That way, starting the node the next time returns it to exactly where you left off (no need to boot the node again). Alternatively you may shutdown inside Linux (run the command sudo poweroff) or poweroff in VirtualBox GUI.
You can safely delete nodes (although you will lose any files on them) as shown in Section 3.2.4. You can create the nodes again using the topology script.
Do not start the base virtual machine, and unless there are problems, do not delete the base virtual machine. It should not be changed—simply run the topology script to clone the base to nodes.
Video: Saving and Powering Off Nodes in VirtualBox (3 min; Feb 2017)
3.4 Troubleshooting virtnet
To be completed: list of likely problems and solutions when using virtnet.