Virtual Networking with VirtualBox
Quick Start (Windows only)
Want to get started with virtnet without reading about it? Follow these steps if your host computer is running Windows.
- Download the base virtual machine base.zip (450MB), and extract/unzip it. Also download the Windows command scripts: vn-topology01.cmd | vn-topology03.cmd | vn-topology05.cmd | vn-topology07.cmd
- Open VirtualBox, and from the "Machine" menu select "Add...". Then browse to the folder of the extracted ZIP and select base.vbox. This should create a virtual machine in VirtualBox called base. Do NOT start the base VM.

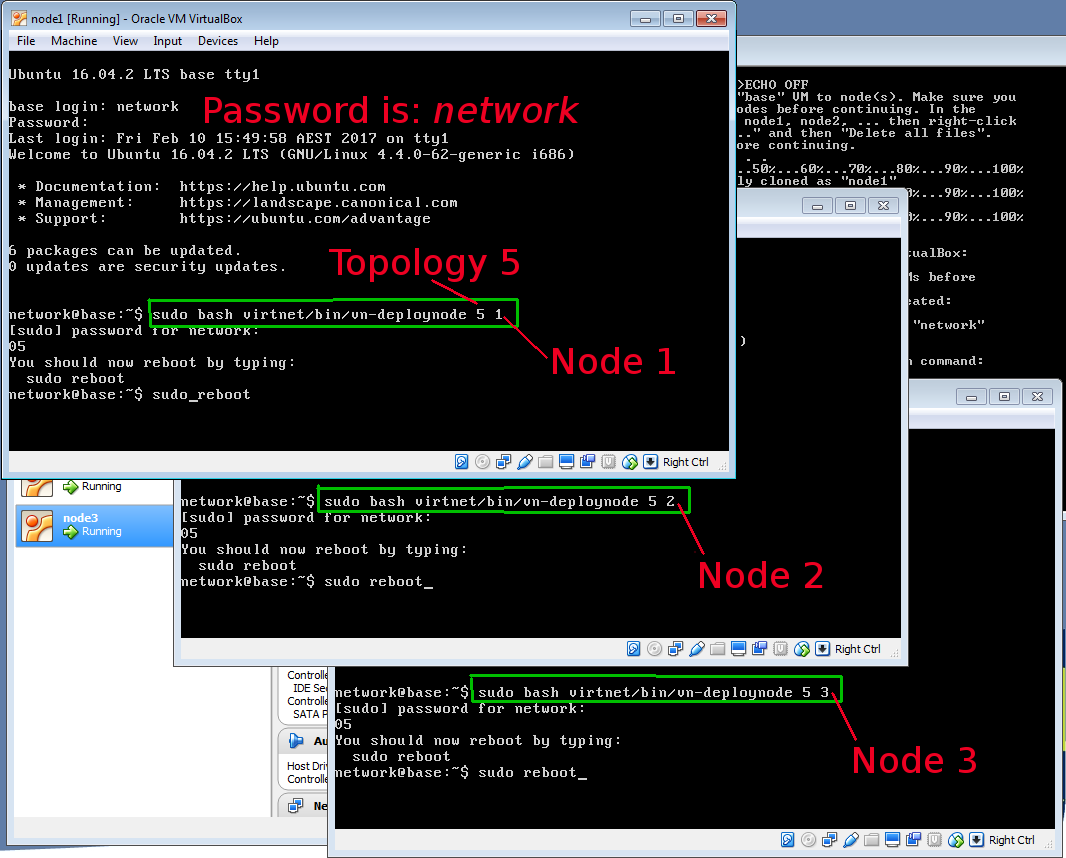
- Double-click on a topology file (e.g. vn-topology05.cmd) and follow the instructions to setup the topology. In short for each node you need to:
- Start the node in VirtualBox
- Login to the node using username network and password network
- Type and run the command:
where x is the topology number (1, 3, 5 or 7) and y is the node number (1, 2, 3, ...).sudo bash virtnet/bin/vn-deploynode x y - Reboot the node with the command:
sudo reboot
The screenshot below is an example for topology 5, which has 3 nodes:
Once all of the nodes have been started, deployed and rebooted, you can start using them.
If you have problems or do not understand the steps, see a video demonstration (17 min).
Using the Virtual Network
The following videos/instructions will help you get started in using virtnet.
- Setting up a virtual Linux network on Windows: Steps to install and configure virtnet, a base Linux virtual machine in VirtualBox, and then use Windows command scripts to deploy virtual network topologies. video (17 min)
- Copying Files from Linux Guest to Windows Host: Use FileZilla (or WinSCP) to copy files from a Linux node in a VirtualBox virtual network to the host Windows computer. video (8 min)
- Saving and Powering Off Nodes in a Virtual Network: Steps for saving nodes and powering off nodes with VirtualBox in a virtual network of Linux nodes. video (3 min)
- Linux Commands for virtnet 1: Files and Directories: A very quick introduction to basic Linux commands necessary for performing tasks in virtnet. Covers: cd, ls, pwd, mkdir, rmdir, cp, mv. video (11 min)
- Linux Commands for virtnet 2: Text Files: Continues from "Linux Commands for virtnet 1" to cover: grep, redirection and pipes. video (8 min)
- Capturing Ping in a Virtual Linux Network: Using a virtual network of Linux nodes, capture ping (ICMP) messages using tcpdump. video (8 min)
Introduction to virtnet
I am using VirtualBox to create multiple virtual machines running Ubuntu Linux, then configuring them to create a virtual network. This virtual network is then used for testing and demonstrating basic networking and security concepts and technologies. To simplify and speed up the process, a single base virtual machine is created in VirtualBox, and then scripts are used to automatically clone the base to the necessary number of nodes and configure those nodes (e.g. IP addresses, names). Several pre-defined network topologies have been created so you can easily build a virtual network.
virtnet refers to the collection of scripts to setup the nodes to create a desired topology. There are two variants of the scripts:
- Generic Bash shell scripts that work on Linux, OSX and Windows hosts (using Cygwin).
- Windows command scripts that are simplified to easily run on Windows 7, 8 or 10.
The generic Bash scripts are more complete and allow for 20+ different topologies. However they require installation of software in advance, especially on Windows hosts. Due to this and teaching requirements (e.g. labs that do not allow software installation) the Windows command scripts were created. Currently they only support 4 topologies.
Windows Hosts only
See the quick start guide.
Linux, OSX and Windows Hosts
Some articles, notes and code for setting up a virtual network with VirtualBox using the generic Bash shell scripts.
Installing virtnet
Getting started with virtnet. The first link is the main set of instructions for installing and setting up a virtual network.
- Automatic Creation of a Virtual Network with VBoxManage: This is the easiest way to quickly get started. Download a VirtualBox image I have created, open it in VirtualBox, and then run some scripts that automatically creates a virtual network. Tested on hosts running Windows (with Cygwin), OSX 10.8 and Ubuntu, and should work on others.
- Screencast of Setting Up virtnet on Ubuntu: 6 minute screencast of me setting up virtnet (e.g. using SVN and adding the machine to VirtualBox) and then creating and using an example topology.
- Troubleshooting with virtnet Virtual Networks: Contains an example terminal output of creating a topology, as well as some solutions for solving common problems in setting up and installing virtnet.
Accessing and Configuring virtnet Nodes
Make your life easier when using virtnet ...
- Accessing VirtualBox Guests from Host using SSH, WinSCP and Tunnelling: Once your virtual network is running, you often need some more convenient ways to access the guests. This article gives a selection of techniques for copying files and gaining remote login access from the host.
- Setting Link Data Rate and Delay in a Linux Virtual Network: Shows how to set the data rate and delay of links between virtual nodes. For example, the link from node1 to node2 can be set to 10 Mb/s with a delay of 20 ms. Useful for running performance tests.
Examples of Using virtnet
Several cases where I have used virtnet to demonstrate networking and security concepts. Also see my list of Linux articles.
- SQL Injection, CSRF, Cooking Stealing and Other Web Attacks
- NTP DDoS Attack
- Ping Flooding DoS Attack
- Setting Linux File Permissions
- IP Address Spoofing with iptables
virtnet Code and Resources
Download the scripts, base image and view the topologies available.
- Code and initial files used in the automatic creation of a virtual network. You can either browse the files, or checkout the repository using a Subversion (SVN) client with the URL: https://sandilands.info/svn/virtnet/.
- Latest VirtualBox virtual machine (disk image plus config files) for the base virtual machine used in the automatic creation of a virtual network: Download. The file is .tar.gz - can be unpacked with most compression software like WinZip - and about 800 MB.
- Images of the current, pre-created topologies.
Other Articles
Some of these articles may be out-of-date or no longer relevant. It is best to try the instructions in the above links first.
- Creating a Virtual Network of Linux Guests using VirtualBox: These are the detailed steps for manually creating a virtual network, including creating the initial base Ubuntu image and configuring it. I suggest starting with the automatic creation first (see the link at the top), and then if you want to tailor your network to your needs, you may try these detailed steps.
- Installing Ubuntu 12.04.2 Server LTS as a Virtual Machine: Screenshots of the installation of Ubuntu Server as a guest.
Created on Thu, 19 Sep 2013, 11:01am
Last changed on Fri, 17 Feb 2017, 1:47pm