Automatic Creation of a Virtual Network with VBoxManage
I am using VirtualBox to create multiple virtual machines running Ubuntu Linux, then configuring them to create a virtual network. This virtual network is then used for testing and demonstrating basic networking and security concepts and technologies. The approach is to create a base virtual machine and the clone it multiple times to create nodes in the network. Each node needs minor configuration, such as setting IP addresses and routes for the network interfaces. I have detailed instructions so that hopefully anyone can create their own virtual network.
To make the creation of the virtual network easier and faster, my aim is to automate as many steps as possible. The ultimate goal is that someone can download a base virtual machine image, specify the desired network topology, and then run a program that creates that virtual network. This article describes my current work towards this goal.
Currently I am constantly testing and improving the steps to automate the virtual network creation. The steps and scripts are poorly designed, implemented and tested. But they work for me and so may be of use to others. However I recommend anyone using these instructions be prepared to for things to go wrong - have a backup at least of your base virtual machine.
Prepare the Host
The VirtualBox command line interface, VBoxManage, and a set of Bash shell scripts (and some common Unix/Linux commands) are used to automate the creation of the virtual network. VBoxManage is installed when VirtualBox is installed. To run the scripts, Bash shell is needed. Bash is supported on most Unix-like operating systems, including Linux and OS X. For Windows, Bash can be run using Cygwin. I have developed the Bash scripts using Ubuntu Linux as the host operating. Some quick testing confirmed that worked also in Cygwin on Windows 7. Further testing is needed to ensure they work successfully on other operating systems. If the scripts do not work on your host, you are stuck with using the manual steps.
There are several steps to perform on your host computer before you can create a virtual network. The first steps, which apply to all host operating systems, are to:
- Install VirtualBox. For Windows and OSX you can download the package from the VirtualBox website; in Ubuntu Linux you can install using the package manager, e.g. sudo apt-get install virtualbox.
- Download the base virtual machine (or alternatively create it yourself using my instructions). The file is a .tar.gz and about 800 MB. Currently the base is up to date to SVN revision 41 (22 Oct 2014). Choose from the following server locations: Thailand, Singapore.
- Unpack the downloaded virtual machine into a directory called base and open it in VirtualBox from the menu Machine -> Add...
Now proceed to the instructions specific to your operating system. A 5 minute demo of performing these steps on Ubuntu Linux is below.
Ubuntu Linux
I have tested on Ubuntu Linux 12.04 LTS and Ubuntu Linux 14.04 LTS. It's highly likely other Linux distributions will also work successfully.
- Install Subversion, e.g. sudo apt-get install subversion
Microsoft Windows
I have tested on Microsoft Windows 7. I hope it will also work in Windows 8.
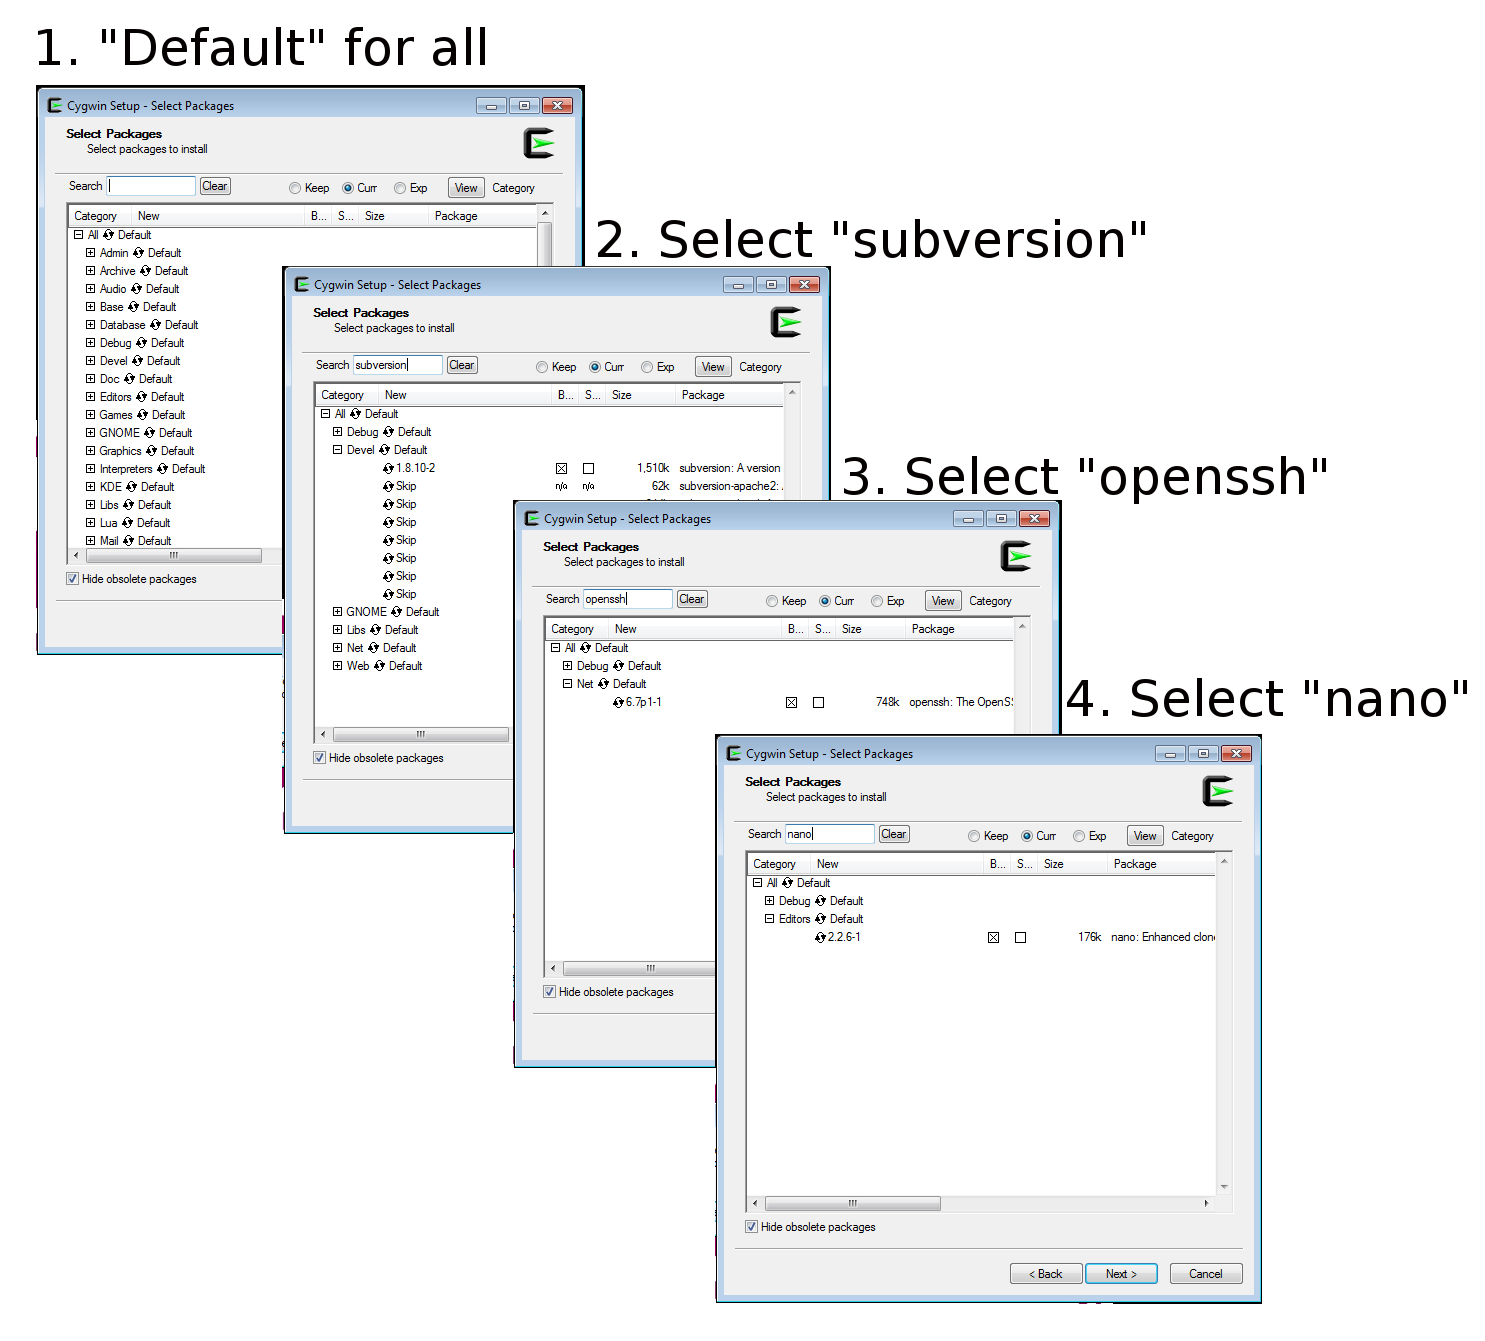
- Install Cygwin. This provides Linux like command line interface, allowing you to run the Bash scripts necessary to create the virtual network. Install the default (minimal) set of packages plus the following (which you need to select manually): subversion, openssh, nano. The picture below shows screenshots of the package selection process - click on it to zoom in.
Once Cygwin is installed, start it and you will be give a shell prompt (i.e. terminal). All subsequent commands are run in Cygwin terminal.
The next step is to setup the Subversion repository. After that is complete, there is a small step specific to Windows to make VBoxManage available in your path.
Mac OS X
This has been successfully tested on OSX 10.8. Subversion is needed. If you don't already have it, then it is available via Xcode:
- Install Xcode, which provides access to Subversion.
- Make Subversion (svn) available on the command line. One option is to set your path in a terminal:
Other options are presented on Superuser.$ PATH="${PATH}:/Applications/Xcode.app/Contents/Developer/usr/bin/"
Usernames and Passwords
If you downloaded the provided base virtual machine then the username and password information is:
- Default user: network; password network
- Root user: root; password network
- MySQL admin password: network
If you create the base virtual machine yourself, then you may use the same passwords.
Checkout the virtnet Subversion Repository
Open a terminal and proceed with the following steps. They should work on all host operating systems that support Bash.
A set of Bash scripts and accompanying data files are used to automate the creation of the virtual network. These are available on my virtnet Subversion repository. First create a directory called svn in your home directory.
sgordon@host:~$ cd ~
sgordon@host:~$ mkdir svn
sgordon@host:~$ cd svn
Now checkout the repository:
sgordon@host:~/svn/$ svn checkout https://sandilands.info/svn/virtnet/
This creates a directory called virtnet inside the ~/svn directory. Enter it and browse the contents. There are two sub-directories that are important at this moment:
- ~/svn/virtnet/bin/host/: contains the Bash scripts for running on the host.
- ~/svn/virtnet/data/topologies/: contains the interfaces files that need to be copied to each virtual machine that is created.
There is one more change to make. The permissions of a SSH private key file must be modified to be readable only by the user. To do so, type:
sgordon@host:~/svn/$ chmod go-rwx ~/svn/virtnet/data/defaults/root/.ssh/id_rsa
Windows 8 Users (2014-11-04). There seems to be a problem with Cygwin with the above command on Windows 8. If you are using Windows 8, before running the above command you should run:If you are using a different locale (e.g. French, German) then the group "Users" above may be different. See the answers to the questions on Superuser and Stackoverflow for more details.sgordon@host:~/svn/$ chgrp -R Users ~/svn/virtnet/data/defaults/root/.ssh
I have prepared some topologies that can be created automatically (you can see images of the topologies in the directory ~/svn/virtnet/data/images/). I describe how the topologies work and how to create your own towards the end of this article.
Microsoft Windows (Cygwin) Only
If your host operating system is Microsoft Windows, you should now setup the path to VBoxManage by executing the following in the Cygwin terminal:
sgordon@cygwin $ cd ~/svn/virtnet/bin/host
sgordon@cygwin $ PATH=${PATH}:.
sgordon@cygwin $ ln -s "/cygdrive/c/Program Files/Oracle/VirtualBox/VBoxManage.exe" VboxManage
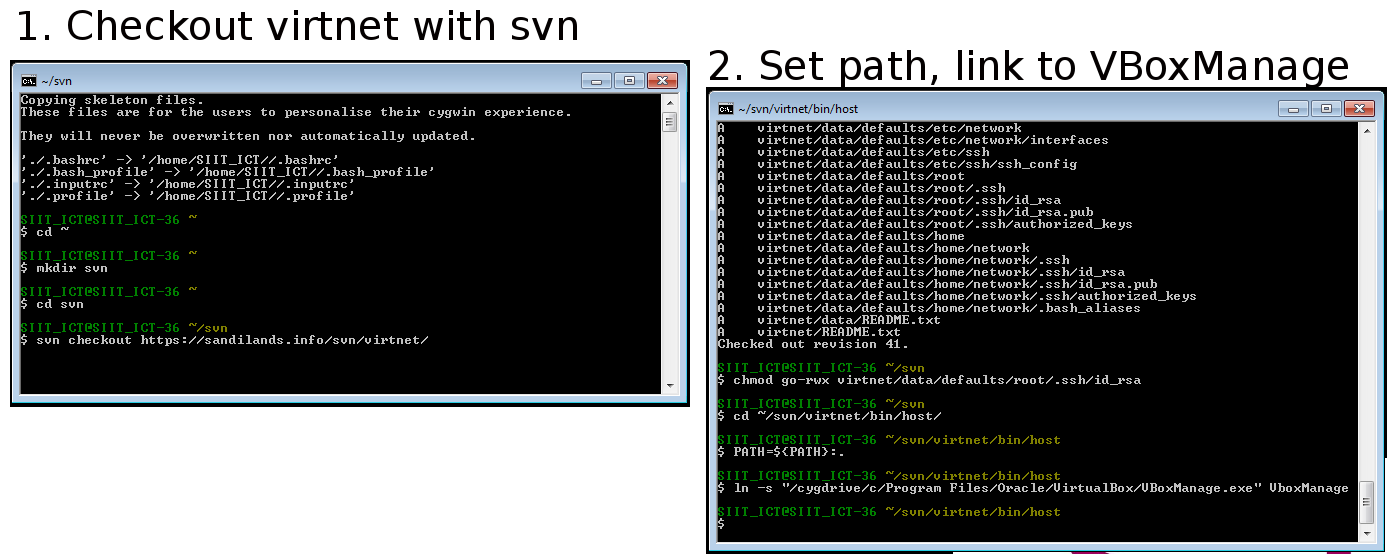
Here is a screenshot of using Cygwin to checkout the SVN repository and then set the path and link to VBoxManage (click on it to zoom in).
You will need to re-run the last two commands everytime you start Cygwin. To avoid this, you can add the following two lines to the file .bash_profile:
PATH=${PATH}:.
ln -s "/cygdrive/c/Program Files/Oracle/VirtualBox/VBoxManage.exe" ~/svn/virtnet/bin/host/VboxManage
Create the Virtual Network
There are a number of pre-created topologies that you can choose from to quickly build a network. See them here. For this demo I'll use topology 5 which contains three nodes:
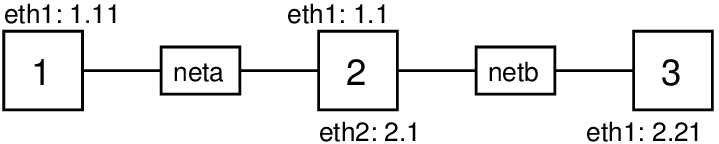
The rectangles in the topology diagram labelled neta and netb are switches created automatically by VirtualBox - they are not virtual machines that we need to create. The IP addresses in all cases start with 192.168.. For example, interface eth1 of node 1 has IP address 192.168.1.11.
Enter the directory containing the Bash scripts:
sgordon@host:~$ cd ~/svn/virtnet/bin/host/
Now run vn-createtopology with the topology number as the first (and only) parameter:
sgordon@host:~/svn/virtnet/bin/host$ bash vn-createtopology 5
This is the main script, which in turn calls others. You will see some output (hopefully) indicating that the virtual machines for the nodes are created. You may be prompted for a password for the root user of the base virtual machine (depending on whether or not you setup public/private keys for SSH).
If all goes well, then the new virtual machines, one for each node in the topology, will be created in VirtualBox. You can now start them and test your network. A quick way to start a VM and login to it is to use the provided script vn-ssh. It takes a parameter as an input, which indicates the node number to start and login to. For example, to start node 1:
sgordon@host:~/svn/virtnet/bin/host$ bash vn-ssh 1
It may take a minute or so, but eventually you should be logged in to node 1. Repeat for other nodes in another terminal, e.g. bash vn-ssh 2 (make sure you are in the correct directory, i.e. ~/svn/virtnet/bin/host).
Troubleshooting
If you encounter problems in setting up and using virtnet, then first see the Troubleshooting page. If that doesn't solve your problem, I recommend sending me an email with a screenshot of the error.
Workflow Summary
One approach to using these scripts for creating virtual networks is:
- Run vn-createtopology to create the desired topology of nodes
- Use the virtual network
- When finished with the virtual network, delete the node virtual machines (when VirtualBox prompts, select to delete all files)
- Repeat from step 1.
You should delete the automatically created nodes before creating a new virtual network (or at least rename them) since the new network will use the same node names, e.g. node1, node2, node3.
The base virtual machine is not used in the virtual network. It is cloned to create the nodes in the network. Keep the base up to date (in terms of required software packages and configuration) so when you create the virtual network the nodes will be up to date.
Creating Your Own Topology
See the README.txt file in the data/topologies/ directory of the SVN repository for an explanation of how to create your own topology.
PDF version of this page, 5 Jan 2015
Created on Wed, 18 Sep 2013, 8:46pm
Last changed on Wed, 03 Feb 2016, 1:43pm