Chapter 7
Users and Permissions
7.1.1 Assumed Knowledge
7.1.2 Linux and Network Setup
7.2 Users and Permissions in Linux
7.2.1 Users
7.2.2 Logins
7.2.3 Passwords
7.2.4 Permissions
7.3 Commands for Managing Users and Permissions
7.4 Users and Permissions by Example
7.4.1 Adding Users
7.4.2 /etc/passwd and /etc/shadow Files
7.4.3 Adding Groups
7.4.4 Creating Files and Directories
7.4.5 Setting Permissions
7.4.6 Summary and Other Issues
7.5 Passwords, Hashes and Rainbow Tables
7.5.1 Storing Actual Passwords
7.5.2 Storing Hashed Passwords
7.5.3 Brute Force Attacks on Hashed Passwords
7.5.4 Pre-calculated Hashes and Rainbow Tables
7.5.5 Salting a Password
7.5.6 Summary and Other Issues
This chapter shows how to manage users and implement access control on files in Linux. This is of value to those studying system administrator or the concepts of authentication and access control in IT security. If you are new to Linux and operating systems then you should cover Section 7.1 through to Section 7.4. Section 7.5 as mainly intended to those studying cryptography that want to understand the reasoning for storing salts and password hashes.
7.1 Prerequisites
7.1.1 Assumed Knowledge
This chapter assumes you have knowledge of:
- Basic operating system concepts, including users, passwords and file systems.
- Authentication, especially password-based authentication.
- Access control techniques, especially discretionary access control.
- (Section 7.5 only) Statistics for communications and security (Appendix B).
Basic Linux command line skills, as covered in Chapter 4, are assumed. You will need to be able to:
- View and edit files, e.g. with cat or nano.
- Perform operations on directories and files, including ls, cd, cp.
7.1.2 Linux and Network Setup
All of the practical tasks in this chapter can be completed on a single Linux computer. Most of the demonstrations use a single Linux computer, specifically node1 in virtnet (Chapter 3). Although virtnet is not required, if you do use it, as only a single computer is necessary, topology 1 is appropriate (or in fact any topology—just use a single node).
7.2 Users and Permissions in Linux
This section explains key concepts of users, passwords and permissions in Linux. The commands used to manage these are given in Section 7.3.
7.2.1 Users
Linux is a multi-user operating system. Typically the users may consist of human users (e.g. people sharing a PC, people with remote login access to a server) or software (e.g. web and email servers that run on the computer). There is one special user called the root user which effectively can do anything on the operating system. The root is equivalent to an Administrator user on other operating systems. They are sometimes referred to as the super user.
Users have accounts which are either created by software automatically, or created by a systems administrator. Every user is allocated a unique username and user identifier (an integer). We will almost always deal with the username, such as network, but the operating system actually deals with the user ID (such as 1000).
The Linux operating system stores user information in the text file /etc/passwd. Normally any user can view this file (but only with special permissions can edit the file). Below is the contents of the file (with some lines removed for brevity).
network@node1:~$ cat /etc/passwd
root:x:0:0:root:/root:/bin/bash
daemon:x:1:1:daemon:/usr/sbin:/usr/sbin/nologin
bin:x:2:2:bin:/bin:/usr/sbin/nologin
sys:x:3:3:sys:/dev:/usr/sbin/nologin
sync:x:4:65534:sync:/bin:/bin/sync
games:x:5:60:games:/usr/games:/usr/sbin/nologin
man:x:6:12:man:/var/cache/man:/usr/sbin/nologin
...
mysql:x:107:111:MySQL Server,,,:/nonexistent:/bin/false
dnsmasq:x:108:65534:dnsmasq,,,:/var/lib/misc:/bin/false
messagebus:x:109:112::/var/run/dbus:/bin/false
sshd:x:110:65534::/var/run/sshd:/usr/sbin/nologin
network:x:1000:1000:network,,,:/home/network:/bin/bash
ntp:x:111:117::/home/ntp:/bin/false
The format of /etc/passwd is explained by example in Section 7.4.2. You can also read the man page by running: man -S5 passwd. Without understanding the format in depth, you should at least notice there is one line per user, with the first user being root and the second to last being our human user account on a virtnet node called network. There are also some software base users, e.g. mysql, sshd.
Most users will have a home directory. By default, non-software users home directory is /home/username. For example, the network users’ home directory is /home/network, while a user called steve would have a home directory of /home/steve.
When system admininstrators create a new user account, they normally set a password (or ask the user to choose a password). Passwords are explained in Section 7.2.3.
7.2.2 Logins
Once a user account is created, that user can login to the system. A successful login requires knowledge of the username and associated password (see Section 7.2.3). Logins can occur when the user has physical access to the system (e.g. sitting in front of your laptop) or via a network connection, i.e. a remote login. As a login involves transferring a confidential password, the network connection should be secure against eavesdropping. Secure Shell (ssh), which encrypts all information sent between the remote computer and system being logged in to, is commonly used for remote logins.
While we normally associate a user with a single person, it is possible (and common) for one person to to gain access to multiple user accounts. Once logged in as one user, it is possible to switch to another user using the command su, and “do” commands as another user with sudo (see Section 7.3).
7.2.3 Passwords
In (very) old versions of Linux, password information of a user was stored in /etc/passwd. However now the password information is stored in a separate file /etc/shadow, which can have stricter permissions as to who can access it. By default, normal users cannot read /etc/shadow—only the root user (and others that have been granted permission) can.
network@node1:~$ sudo cat /etc/shadow
root:$6$ptPZriYa$RITj6s2CUcYkdm.E6JtqNNXKO6emTIjh70uvSthKKUv9fqXLXt/7dKH4/JL8fF
CG/Az3Ly3oAWJdZYAKuxyGI1:17207:0:99999:7:::
daemon:*:17001:0:99999:7:::
bin:*:17001:0:99999:7:::
sys:*:17001:0:99999:7:::
sync:*:17001:0:99999:7:::
games:*:17001:0:99999:7:::
man:*:17001:0:99999:7:::
...
mysql:!:17207:0:99999:7:::
dnsmasq:*:17207:0:99999:7:::
messagebus:*:17207:0:99999:7:::
sshd:*:17207:0:99999:7:::
network:$6$CTCPVdyr$8FktuJpfj2Nym8LsDtoMZnC/ZZyIeRqLtdTGiU7Tv/LFh3HEzbDMT0kkSao
UJ2DpwQjodasBGkJv311.ZGpeL0:17207:0:99999:7:::
ntp:*:17207:0:99999:7:::
The format of the shadow file is explained by example in Section 7.4.2, and in depth via man -S5 shadow. Note that a user’s password is not normally stored directly, but rather a hash of the password is stored. The reasoning for this is discussed in depth in Section 7.5.
Users can change their passwords by running the passwd command. There may be restrictions on the type of password, which are often implemented via Pluggable Authentication Modules (PAM). While outside the scope of this chapter, a starting point to explore PAM and passwords is to read the file /etc/pam.d/common-password.
7.2.4 Permissions
In Linux, discretionary access control is commonly used, where the users of a Linux system are the subjects, files (and directories, which are actually special case of files) are the objects, and access rights are referred to as permissions or modes of access. Users have permission to perform operations on specific files.
The operations that a user can perform on a file when granted permission are:
- Read, r
- read the file; view the contents
- Write, w
- write to the file, including delete the file
- eXecute, x
- execute the file, e.g. as an application or script
The permissions on directories are the same, but have slightly different meaning:
- Read, r
- list the contents of the directory, e.g. what files are in the directory
- Write, w
- create new files/directories in directory, rename existing files/directories
- eXecute, x
- access files in the directory
Note that without the x permission on a directory, files within the directory cannot be read or modified, no matter the file permissions
With respect to a single file/directory, users on a system are within one of the following categories:
- User owner, u
- a single user with specific permissions
- Group owner, g
- everyone in the group has the same permissions
- Other users, o
- that is, users that are not the owner or in the group.
For example, assume there are five users in the system: Steve, Lily, Ahmed, Scott and Marilyn. Steve, Lily and Ahmed are in the staff group. Lily and Scott are in the student group. If file f.txt has user owner Steve and group owner staff , then with respect to that file, the others are Scott and Marilyn (since they are not the user owner and they are not in the staff group).
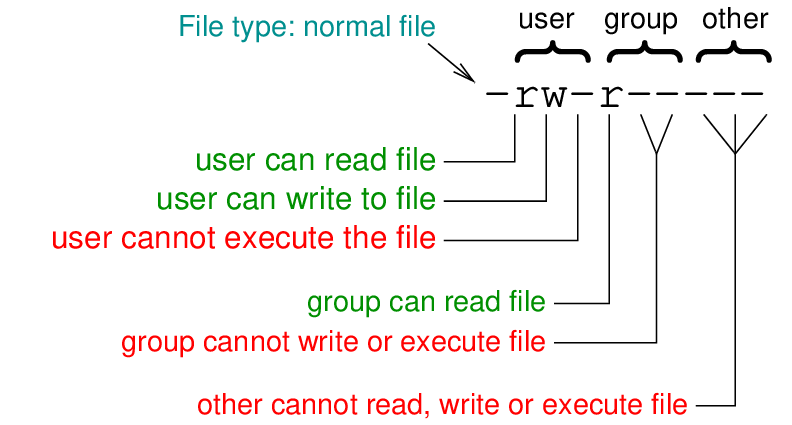
Detailed file information, including permissions and owners, can be listed with ls -l command.
$ ls -l f.txt
-rw-r----- 1 steve staff 1036 Jul 17 07:28 f.txt
The output of the ls -l command lists 10 characters at the start. The very first character is typically a dash (-) if this is a file or a d if it is a directory. Then the next 9 characters are the permissions. The letter (r, w or x) indicates the permission is allowed, while a dash (-) means it is not. The full ordering is: rwxrwxrwx, where the first rwx is permissions of user owner, the second rwx are permissions of the group owner, and the last rwx are the permissions of others.
7.3 Commands for Managing Users and Permissions
The following gives brief examples of useful commands in Linux for creating/modifying users and permissions. Most of these commands are further illustrated by a detailed example in Section 7.4. The commands in this section show the syntax. You should change the commands to suit your needs. That is, replace username, groupname, filename and other parameters with appropriate values.
Create a new user called username:
network@node1:~$ sudo adduser username
Create a new group called groupname:
network@node1:~$ sudo addgroup groupname
Add a user called username to the group called groupname:
network@node1:~$ sudo adduser username groupname
Read the manual (help) page for a command, e.g. for adduser:
network@node1:~$ man adduser
Switch to another user called username:
network@node1:~$ su username
If a username is not specified, then su will attempt to switch to the root user. su on it’s own can therefore be thought of as “super user”, while passing a username it behaves as “switch user”.
To perform a single command as a different user (including the super user), use sudo. This was illustrated above using adduser. sudo can be thought of as “as super user do the following command”. There is also an option to specify a username using sudo -u username, so it becomes “switch to the specified user and do the following command”.
Open a text file in an editor (e.g. /etc/passwd, /etc/shadow). You can also use this to create a new file.
network@node1:~$ nano filename
Some files/operations are restricted for the admin users (including the user called network). To access these files or perform these operations, precede the command with sudo:
network@node1:~$ cat /etc/shadow


cat: /etc/shadow: Permission denied
network@node1:~$ sudo cat /etc/shadow
root: ....
Create a new directory called dir:
network@node1:~$ mkdir dir
View the contents of directories:
network@node1:~$ ls -l
Set the mode (permissions) for a file called filename (or directory):
network@node1:~$ chmod mode filename
where mode is formatted as: SubjectOperationPermission. Subject includes: u, g, o, a. Operation includes: +, -, =. Permission includes: r, w, x. E.g.
- chmod u+r filename
- chmod go-rx filename
- chmod a+rw dirname
Change the user owner and group owner of a file (or directory) to be user username and group groupname:
network@node1:~$ chown username.groupname filename
For example:
network@node1:~$ ls -l abc.txt
-rw-rw-r-- 1 sgordon sgordon 428 Sep 20 16:37 abc.txt
network@node1:~$ chown sgordon.faculty abc.txt
network@node1:~$ ls -l abc.txt
-rw-rw-r-- 1 sgordon faculty 428 Sep 20 16:37 abc.txt
Change the group owner (only, not the user):
network@node1:~$ chgrp groupname filename
A user can change their own password:
network@node1:~$ passwd
or change the password of another user (if they know that users original password):
network@node1:~$ passwd username
7.4 Users and Permissions by Example
We now use a detailed example to demonstate commands for managing users and permissions. The example is based on a scenario where our Linux system will have multiple users, including students and instructors. We will focus on three users, Steve, Priyanka and Courtney, where Steve and Courtney are instructors. The access control requirements are:
- No-one else can access the files or directories of Priyanka.
- No-one can access Steve’s files, except one directory (called lab) can be accessed and modified by instructors.
- All users can access the files of Courtney (and being an instructor, Courtney can access the lab directory).
We present one implementation of these requirements. Note that there may be different interpretations (such as what does “access” mean?), so it is not the only solution. The example solution includes examples of basic user management and permission commands such as:
- Creating users and groups, adding users to groups: adduser, addgroup
- Listing files and directories with ls and options
- Changing permissions and ownership: chmod, chown
- Switching between users: su
Examples of files /etc/passwd, /etc/shadow and /etc/group are also given.
The focus of this section is showing examples of the commands and output. Each command is not explained in depth; rather you should consult the man page to find details of the command syntax and options.
For a short lecture on Linux file permissions, see these lecture notes and the accompanying video:
Video: Linux Permissions Examples (41 min; Feb 2015)
A series of six videos also demonstrate Linux permissions via examples, including: read, write, execute permissions, users and groups, and commands whoami, groups, id, sudo, su, chown, chgrp, chmod, adduser, addgroup, deluser. Note that the examples from these videos are different (older) than those covered in the remainder of this section.
Video: Basic Linux permissions part 1: Permissions explained (10 min; Feb 2012)
Video: Basic Linux permissions part 2: Examples of rwx (23 min; Feb 2012)
Video: Basic Linux Permissions part 3: Switching Users and sudo (10 min; Feb 2012)
Video: Basic Linux Permissions part 4: Changing permissions and owners (14 min; Feb 2012)
Video: Basic Linux Permissions part 5: Managing Users (23 min; Feb 2012)
Video: Basic Linux Permissions part 6: sudo and sudoers (20 min; Mar 2012)
7.4.1 Adding Users
The first task is to add some users. I’ll add three users called steve, priyanka and courtney. The command used is adduser, which creates the user and their home directory and prompts for information about the new user, including password.
network@node1:~$ sudo adduser steve
Adding user `steve' ...
Adding new group `steve' (1001) ...
Adding new user `steve' (1001) with group `steve' ...
Creating home directory `/home/steve' ...
Copying files from `/etc/skel' ...
Enter new UNIX password:
Retype new UNIX password:
passwd: password updated successfully
Changing the user information for steve
Enter the new value, or press ENTER for the default
     Full Name []:
     Room Number []:
     Work Phone []:
     Home Phone []:
     Other []:
Is the information correct? [Y/n]
network@node1:~$ sudo adduser priyanka
Adding user `priyanka' ...
...


Is the information correct? [Y/n]
network@node1:~$ sudo adduser courtney
Adding user `courtney' ...
...
Is the information correct? [Y/n]
7.4.2 /etc/passwd and /etc/shadow Files
User information is stored in two configuration files: /etc/passwd and /etc/shadow. Lets first look at /etc/passwd. On a Ubuntu system there are many system users already. Rather than showing the details of system users I want to see the details of the 3 newly created users. So we can use tail to show the last 3 lines of the file /etc/passwd. (If you want to see the entire file, use cat /etc/passwd).
network@node1:~$ tail -3 /etc/passwd
steve:x:1001:1001:,,,:/home/steve:/bin/bash
priyanka:x:1002:1002:,,,:/home/priyanka:/bin/bash
courtney:x:1003:1003:,,,:/home/courtney:/bin/bash
Each line contains information about a single user, with fields separate by a colon (:). The first field is the username. The second field we see an ‘x’. This field is for the password, but the value ‘x’ is a special value that indicates password information is stored in a separate file /etc/shadow. We’ll see that file shortly. The third field is the user ID. In Linux, users are in fact identified by this ID. The username is just a more friendly identified of the user. The fourth field is the group ID for this user. We see the group and user IDs are identical in this example, but it doesn’t have to be. We’ll see the group names shortly. The field with three commads („,) normally stores the users full name, office, phone number etc. But when I created the users I left this information blank. The sixth field is the users home directory and the last field is the shell program that is run when the user logs in.
Further explanation of the structure of the /etc/passwd file can be found by reading the man page: man -S5 passwd.
The special value of ‘x’ in the password field in /etc/passwd indicates password information is stored in /etc/shadow. Below we see the password information for our 3 new users. Note that in the file the information for each user is on the same line; it is only wrapped below to fit on the page.
network@node1:~$ sudo tail -3 /etc/shadow
steve:$6$9TX8CxpR$GTaHPOnAseQHIDrpV2bm5kOZ5wf1G/rjXI5o/AtfBN6Ts.WdQlwnxDpXTnWV5
    ynXFhIkP5hfUdj4pWI2Y8A9M0:16075:0:99999:7:::
priyanka:$6$FLJBCaNe$l0MS4aMPJtZ6wMajKKP9lKNqTqkccyGiABPF5pePOnvbvdSBcr.uM8hMSV
    PN5Q1l3YfCHtpG.JG6W7DqnPr4F0:16075:0:99999:7:::
courtney:$6$by3fbvXY$D5H2ZGgz0m2vCXVzWhQxr4ZqeSeboj8IeTCExF37F/5uHO168K/0AdzucV
    TaAY9WqyBp8nUs0V/7gJPjwZ/Ay/:16075:0:99999:7:::
The structure of the /etc/shadow file is explained in the man page: man -S5 shadow. Let’s focus on the second field, which is in fact split into three sub-fields separated by dollar signs ($). Take for example the value for steve.
- Hash algorithm identifier: 6 (SHA-512)
- Salt value: 9TX8CxpR
- Hash of salted password: GTaHPOnAseQHIDrpV2bm5kOZ5wf1G/rjXI5o/AtfBN6Ts.W dQlwnxDpXTnWV5ynXFhIkP5hfUdj4pWI2Y8A9M0
For an explanation on why the hash of a salted password is stored, see Section 7.5. For details on the format of these fields, including the list of hash algorithms, see the man page: man crypt (the relevant information is in the Notes under Glibc notes).
7.4.3 Adding Groups
Now lets create a new group called instructors using the addgroup command. The group name and group ID is stored in the file /etc/group.
network@node1:~$ sudo addgroup instructors
Adding group `instructors' (GID 1004) ...
Done.
network@node1:~$ tail -4 /etc/group
steve:x:1001:
priyanka:x:1002:
courtney:x:1003:
instructors:x:1004:
Recall the /etc/passwd file lists a users primary group ID. For example, steve is in the group 1001; the file above shows the name of group 1001 is steve (the group name and user name do not have to be the same; its just the default in Ubuntu). In addition, others may be in a group. Lets add steve and courtney to the group instructors using the command adduser.
network@node1:~$ sudo adduser steve instructors
Adding user `steve' to group `instructors' ...
Adding user steve to group instructors
Done.
network@node1:~$ sudo adduser courtney instructors
Adding user `courtney' to group `instructors' ...


Adding user courtney to group instructors
Done.
network@node1:~$ tail -4 /etc/group
steve:x:1001:
priyanka:x:1002:
courtney:x:1003:
instructors:x:1004:steve,courtney
We now see in the file /etc/group that instructors contains steve and courtney.
7.4.4 Creating Files and Directories
We now have three users, each in their own group, as well as two of those users in another group. To demonstrate access control in Linux (i.e. permissions), we first need some files and directories. The following shows the creation of some dummy files and directories for each user. We will set the permissions later. The command su is used to switch to another user (of course you need that users password). There are many ways to create files: I created simple text files by echoing a string into a file.
network@node1:~$ su priyanka
Password:
priyanka@node1:/home/network$ cd
priyanka@node1:~$ mkdir teaching
priyanka@node1:~$ mkdir private
priyanka@node1:~$ echo "notes" > notes.txt
priyanka@node1:~$ echo "exam" > teaching/exam.txt
priyanka@node1:~$ echo "personal" > private/personal.txt
priyanka@node1:~$ exit
exit
network@node1:~$ su steve
Password:
steve@node1:/home/network$ cd
steve@node1:~$ mkdir lab
steve@node1:~$ mkdir its335
steve@node1:~$ echo "papers" > papers.txt
steve@node1:~$ echo "manual" > lab/manual.txt
steve@node1:~$ echo "quiz" > its335/quiz.txt
steve@node1:~$ exit
exit
network@node1:~$ su courtney
Password:
courtney@node1:/home/network$ cd
courtney@node1:~$ mkdir lecture
courtney@node1:~$ echo "week1" > lecture/week1.txt


courtney@node1:~$ echo "schedule" > schedule.txt
courtney@node1:~$ exit
exit
Note that its335 is an example subject code used by a university in this example.
7.4.5 Setting Permissions
Now we will look at and when necessary change the permissions for each user.
Permissions for Priyanka
The access control requirements for priyanka is that no-one else can access their files or directories. First lets switch to user priyanka, cd into their home directory, and then list all files/directories recursively (i.e. list the files/directories in their home, then the files/directories in those directories, and so on).
network@node1:~$ su priyanka
Password:
priyanka@node1:/home/network$ cd
priyanka@node1:~$ ls -lR
.:
total 12
-rw-rw-r-- 1 priyanka priyanka    6 Jan  5 09:44 notes.txt
drwxrwxr-x 2 priyanka priyanka 4096 Jan  5 09:45 private
drwxrwxr-x 2 priyanka priyanka 4096 Jan  5 09:45 teaching

./private:
total 4
-rw-rw-r-- 1 priyanka priyanka 9 Jan  5 09:45 personal.txt

./teaching:
total 4
-rw-rw-r-- 1 priyanka priyanka 5 Jan  5 09:45 exam.txt
Permissions are explained in Section 7.2.4. To read more about Linux permissions, you can use the info documentation (which is often more detailed than man pages) by typing: info coreutils ‘file permissions’. It contains quite a good and complete description of file permissions.
From the listing of the files by priyanka we see the default permissions are:
- User can read and write, group can read and write, others can read files
- User can read, write, execute, group can read, write and execute, others can read and execute directories (note executing directories means access, e.g. cd into the directory).
Recall that the default group contains only the user. In summary, priyanka can read and write files, other users can only read their files. We want to prevent others from being able to read their files. There are different ways this can be achieved. We will use just one approach (whether or not its the best approach depends on what may happen on the system in the future, e.g. will new users be added? will we want to allow them access to some of Priyanka’s files?).
First note the permissions on each users home directory.
priyanka@node1:~$ ls -l /home/
total 16
drwxr-xr-x 3 courtney courtney 4096 Jan  5 09:49 courtney
drwxr-xr-x 7 network  network  4096 Dec 28 15:23 network
drwxr-xr-x 4 steve    steve    4096 Jan  5 09:48 steve
drwxr-xr-x 4 priyanka priyanka 4096 Jan  5 09:45 priyanka
By default, each users home directory is readable and executable by other users. That is, other users can list the files/directories in Priyanka’s home, and they can also cd into Priyanka’s home directory (due to the execute permission). A quick way to block access for other users on all of Priyanka’s files is to remove the read/execute permissions on their home directory using chmod (note that ‘.’ refers to the current directory, which is Priyanka’s home directory).
priyanka@node1:~$ chmod o-rx .
priyanka@node1:~$ ls -l /home/
total 16
drwxr-xr-x 3 courtney courtney 4096 Jan  5 09:49 courtney
drwxr-xr-x 7 network  network  4096 Dec 28 15:23 network
drwxr-xr-x 4 steve    steve    4096 Jan  5 09:48 steve
drwxr-x--- 4 priyanka priyanka 4096 Jan  5 09:45 priyanka
Other users no longer have read or execute permissions on /home/priyanka. If you cannot change into a directory, then it also applies all sub-directories (irrespective of their permissions). Lets check by switching to user steve and trying to list/access some directories and files.
priyanka@node1:~$ su steve
Password:
steve@node1:/home/priyanka$ ls
ls: cannot open directory .: Permission denied
steve@node1:/home/priyanka$ ls private
ls: cannot access private: Permission denied


steve@node1:/home/priyanka$ cd private
bash: cd: private: Permission denied
steve@node1:/home/priyanka$ cat notes.txt
cat: notes.txt: Permission denied
steve@node1:/home/priyanka$ cat teaching/exam.txt
cat: teaching/exam.txt: Permission denied
steve@node1:/home/priyanka$ exit
exit
priyanka@node1:~$ exit
exit
The above simple test shows steve cannot access anything in Priyanka’s home directory (even if he knows the file names). We achieved our requirement for Priyanka.
Permissions for Steve
Now lets consider steve. The access control requirements are that no-one can access his files, except one directory (lab) can be accessed and modified by users in the instructors group. Again, there are different ways to implement this. We’ll look at just one approach.
network@node1:~$ su steve
Password:
steve@node1:/home/network$ cd
steve@node1:~$ ls -lR
.:
total 12
drwxrwxr-x 2 steve steve 4096 Jan  5 09:48 its335
drwxrwxr-x 2 steve steve 4096 Jan  5 09:47 lab
-rw-rw-r-- 1 steve steve    7 Jan  5 09:47 papers.txt

./its335:
total 4
-rw-rw-r-- 1 steve steve 5 Jan  5 09:48 quiz.txt

./lab:
total 4
-rw-rw-r-- 1 steve steve 7 Jan  5 09:47 manual.txt
By default, the group owner of the lab directory is the same as the user, i.e. steve. Lets change the group owner to instructors using chown. We will do it recursively (-R) to also change ownership of existing files inside the directory.
steve@node1:~$ chown -R steve.instructors lab
steve@node1:~$ ls -lR


.:
total 12
drwxrwxr-x 2 steve steve       4096 Jan  5 09:48 its335
drwxrwxr-x 2 steve instructors 4096 Jan  5 09:47 lab
-rw-rw-r-- 1 steve steve          7 Jan  5 09:47 papers.txt

./its335:
total 4
-rw-rw-r-- 1 steve steve 5 Jan  5 09:48 quiz.txt

./lab:
total 4
-rw-rw-r-- 1 steve instructors 7 Jan  5 09:47 manual.txt
Now that the instructors group owns the lab directory, we need to make it (and the files inside it) writable by the group. We also want to make all files and directories inaccessible to others.
steve@node1:~$ chmod -R g+w lab/
steve@node1:~$ chmod go-rwx papers.txt its335/ its335/quiz.txt
steve@node1:~$ chmod -R o-rwx lab/
steve@node1:~$ ls -lR
.:
total 12
drwx------ 2 steve steve       4096 Jan  5 09:48 its335
drwxrwx--- 2 steve instructors 4096 Jan  5 09:47 lab
-rw------- 1 steve steve          7 Jan  5 09:47 papers.txt

./its335:
total 4
-rw------- 1 steve steve 5 Jan  5 09:48 quiz.txt

./lab:
total 4
-rw-rw---- 1 steve instructors 7 Jan  5 09:47 manual.txt
Now do some simple tests, first as user priyanka who is not in the instructors group (as can be seen by using the groups command).
steve@node1:~$ su priyanka
Password:
priyanka@node1:/home/steve$ groups
priyanka
priyanka@node1:/home/steve$ cd lab
bash: cd: lab: Permission denied
priyanka@node1:/home/steve$ ls its335/
ls: cannot open directory its335/: Permission denied


priyanka@node1:/home/steve$ exit
exit
Priyanka cannot access any of Steve’s files. Now try for courtney who is in the instructors group.
steve@node1:~$ su courtney
Password:
courtney@node1:/home/steve$ groups
courtney instructors
courtney@node1:/home/steve$ ls its335/
ls: cannot open directory its335/: Permission denied
courtney@node1:/home/steve$ cd lab/
courtney@node1:/home/steve/lab$ ls -l
total 4
-rw-rw---- 1 steve instructors 7 Jan  5 09:47 manual.txt
courtney@node1:/home/steve/lab$ echo "more" >> manual.txt
courtney@node1:/home/steve/lab$ echo "new" > new.txt
courtney@node1:/home/steve/lab$ ls -l
total 8
-rw-rw---- 1 steve    instructors 12 Jan  5 10:14 manual.txt
-rw-rw-r-- 1 courtney courtney     4 Jan  5 10:14 new.txt
courtney@node1:/home/steve/lab$ exit
exit
steve@node1:~$ exit
exit
Courtney can view and edit the files inside the lab directory. He adds the word “more” to manual.txt and creates a new file called new.txt.
Permissions for Courtney
Finally, the requirements for user courtney is that all other users can read Courtney’s files.
network@node1:~$ su courtney
Password:
courtney@node1:/home/network$ cd
courtney@node1:~$ ls -lR
.:
total 8
drwxrwxr-x 2 courtney courtney 4096 Jan  5 09:49 lecture
-rw-rw-r-- 1 courtney courtney    9 Jan  5 09:49 schedule.txt

./lecture:


total 4
-rw-rw-r-- 1 courtney courtney 6 Jan  5 09:49 week1.txt
The default permissions are sufficient: Courtney can read/write their own files, other users can read Courtney’s files. A quick test by switching to user priyanka.
courtney@node1:~$ su priyanka
Password:
priyanka@node1:/home/courtney$ cat schedule.txt
schedule
priyanka@node1:/home/courtney$ echo "edit" >> schedule.txt
bash: schedule.txt: Permission denied
priyanka@node1:/home/courtney$ cd lecture/
priyanka@node1:/home/courtney/lecture$ cat week1.txt
week1
priyanka@node1:/home/courtney/lecture$ exit
exit
courtney@node1:~$ exit
exit
7.4.6 Summary and Other Issues
So we have some examples of using chown and chmod to change the ownership and permissions to implement access control in Linux. However note that there are different ways to implement the access control requirements - we have considered just one approach. You may want to consider others, and the tradeoffs between them. Other things to consider include:
- How to change the default permissions and ownership when files are created? (Hint: /etc/login.defs and umask)
- How to make files that one user creates in a shared directory have the same ownership as that directory (as opposed to the user that created them)? (Hint: setuid)
- When setting the group execute permission on a directory, does it restrict other users in that group from deleting files in that directory? (Hint: sticky bit)
- What are the default files/directories created when you create a new user? (Hint: /etc/skel)
For completness, the listing all three users files/directories is below.
network@node1:~$ sudo ls -lR /home/priyanka/ /home/steve/ /home/courtney/
[sudo] password for network:
/home/courtney/:
total 8
drwxrwxr-x 2 courtney courtney 4096 Jan  5 09:49 lecture
-rw-rw-r-- 1 courtney courtney    9 Jan  5 09:49 schedule.txt

/home/courtney/lecture:
total 4
-rw-rw-r-- 1 courtney courtney 6 Jan  5 09:49 week1.txt

/home/steve/:
total 12
drwx------ 2 steve steve       4096 Jan  5 09:48 its335
drwxrwx--- 2 steve instructors 4096 Jan  5 10:14 lab
-rw------- 1 steve steve          7 Jan  5 09:47 papers.txt

/home/steve/its335:
total 4
-rw------- 1 steve steve 5 Jan  5 09:48 quiz.txt

/home/steve/lab:
total 8
-rw-rw---- 1 steve    instructors 12 Jan  5 10:14 manual.txt
-rw-rw-r-- 1 courtney courtney     4 Jan  5 10:14 new.txt

/home/priyanka/:
total 12
-rw-rw-r-- 1 priyanka priyanka    6 Jan  5 09:44 notes.txt
drwxrwxr-x 2 priyanka priyanka 4096 Jan  5 09:45 private
drwxrwxr-x 2 priyanka priyanka 4096 Jan  5 09:45 teaching

/home/priyanka/private:
total 4
-rw-rw-r-- 1 priyanka priyanka 9 Jan  5 09:45 personal.txt

/home/priyanka/teaching:
total 4
-rw-rw-r-- 1 priyanka priyanka 5 Jan  5 09:45 exam.txt
7.5 Passwords, Hashes and Rainbow Tables
Many computer systems, including online systems like web sites, use passwords to authenticate human users. Before using the system, the user is registered, where they normally select a username and password (or it is allocated to them). This information is then stored on the computer system. When the user later wants to access the computer system they submit their username and password, and the system checks the submitted values against the stored values: if they match the user is granted access.
There are many problems with using passwords for authentication, including being easy to guess, hard to remember, and possible to intercept across a network. In this article I focus on just one problem: the storage of the registered password on the system must be performed in a manner so that someone with access cannot discover other users’ passwords.
7.5.1 Storing Actual Passwords
Consider a web site with user login as an example. Users of the website first register, and then once registered may login to gain personalized web content. Upon registration each user selects a unique username and their own password. Assume that the system stores these two values, username and password, in a database. So a website with 1000’s users will have a database table such as:
| username | password |
| john | mysecret |
| sandy | ld9a%23f |
| daniel | mysecret |
| … | … |
| steve | h31p_m3? |
The obvious problem with this approach is that anyone who gains access to this database can see other users’ passwords. Although such database will not be publicly accessible, within the organisation maintaining the website there may be multiple people who require read access to the database. It is therefore very easy for these people to view the actual passwords of many other people. Although this is a potential security issue for storing actual passwords, in many cases you will trust the organisation providing the database/website. Even if they couldn’t read the database, since you are sending them your password it may be possible for people within that organisation to see your password.
A worse scenario is if the database becomes available to people outside the organisation. For example, the security of the organisations computer system has flaws such that a malicious user can gain unintended read access to the database. That malicious user has then discovered all passwords of the 1000’s of users. They can use this information to masquerade as those users on the website, and since many people re-use passwords across different systems, the malicious user can also can gain unintended access to other systems.
Its this last scenario, of an external malicious user being able to read all passwords, that we want to prevent. From now on we will assume it is possible for a malicious user to gain read access to the database, hence storing actual passwords is not a secure option.
7.5.2 Storing Hashed Passwords
Rather than storing the actual password in the database, a hash of the password can be stored. Recall that good hash functions have several useful practical properties:
- Take a variable sized input and produce a fixed length, small output, i.e. the hash value
- Hash of two different inputs produces two different output hash values (i.e. no collisions)
- Given the output hash value, its practically impossible to find the corresponding input (i.e. a one-way function)
Further discussion of hash functions can be found in my lecture notes on the topic.
So for example with Message Digest 5 hash function (MD5) as a hash function, john’s password of mysecret would not be stored, but instead MD5(mysecret) is stored, i.e. 06c219e5bc8378f3a8a3f83b4b7e4649. Note that MD5 produces a 128-bit hash value—here it is stored in hexadecimal. The database stored is now:
| username | H(password) |
| john | 06c219e5bc8378f3a8a3f83b4b7e4649 |
| sandy | 5fc2bb44573c7736badc8382b43fbeae |
| daniel | 06c219e5bc8378f3a8a3f83b4b7e4649 |
| … | … |
| steve | 75127c78fd791c3f92a086c59c71ece0 |
When user john logs in to the web site he submits his username and password mysecret. The website calculates the MD5 hash of the submitted password and gets 06c219e5bc8378f3a8a3f83b4b7e4649. Now the website compares the hash of the submitted password with the hash value stored in the database. As secure hash functions do not produce collisions, if the two hash values are the same then it implies the submitted password is the same as the original registered password. If they don’t match, then the login attempt is unsuccessful.
Now assume a malicious user gains access to the database. They can see the hash values, but because of the one-way property of secure hash functions they cannot easily determine what the original password was. So by storing the hash of the password, instead of the actual password, the system offers significantly increased security.
7.5.3 Brute Force Attacks on Hashed Passwords
Above I said with a hash function it is practically impossible to find the input (password) given only the output hash value. What does “practically impossible” mean? Using the best known algorithms, with current (and near future) computing capabilities, it takes too long or will be too expensive to find the input password. I will not attempt to explain, and in fact some details I don’t understand myself, but the amount of effort to find the input given an -bit hash value is approximately equivalent to the effort of guessing a -bit random number. That is, requires on order of attempts. MD5 uses a 128-bit hash, so it will take about or attempts to find the password. At a rate of attempts per second, that is around years.
But the above is generally only true with large inputs (at least larger than the hash value). This is NOT the case with passwords. Most users choose short passwords (e.g 4 to 8 characters) so that they are easy to remember and input when logging in. Consider the case when users choose passwords that are always 8 characters long. Lets look at how many possible passwords there are and then see what an malicious user needs to do to find a password given only the hash value.
Lets assume a password is chosen from the set of characters that can be entered on an English keyboard. There are 52 letters (uppercase and lowercase), 10 digits, and another 32 punctuation characters (!, @, #, …). So with a set of 94 characters to choose from, the number of 8 character-long passwords is or about .
Now lets assume the malicious user has the database of users and hashed passwords. They are looking for John’s password, i.e. they know the hash value 06c219e5bc8378f 3a8a3f83b4b7e4649. They then calculate the hashes of all possible passwords. When they find a resulting hash value that matches John’s hash value, then they’ve found John’s password. The m attempts the malicious user makes are summarised below:
Stored hash: 06c219e5bc8378f3a8a3f83b4b7e4649
Attempt 1: password1 = 00000000; hash1 = dd4b21e9ef71e1291183a46b913ae6f2
Attempt 2: password2 = 00000001; hash2 = ced165163e51e06e01dc44c35fea3eaf
Attempt 3: password3 = 00000002; hash3 = cc540920e91f05e4f6e4beb72dd441ac
...
Attempt m-1: passwordm-1 = mysecres; hashm-1 = 38a83897d7f7a8a2889bf6472e534567
Attempt m: passwordm = mysecret; hashm = 06c219e5bc8378f3a8a3f83b4b7e4649 <== matches stored hash
The worst case for the malicious user, assuming users choose random passwords, hashes would need to be calculated to find a user’s password. Can this be done within a reasonable time and cost? To have an idea we need to be able to estimate how long it takes to perform a hash (since the hash operation will be the most time consuming by far). This of course depends on the hardware performing the operation (and to a lesser extent the software). Consider for example oclHashcat, software for performing hashes on GPUs (GPUs are generally much faster than CPUs because they are designed to support many parallel operations at once). The performance benchmarks using an AMD HD6990 GPU indicate about hashes per second can be calculated. Another site, by Ivan Golubev, estimates hash calculations on the same GPU at a rate of upto hashes per second. The HD6990 is about 2 years old (costing about 800 dollars when released). For simplicty lets assume, we can calculate hashes per second, for a cost of about 400 dollars of hardware.
With hashes to attempt at a rate of hashes per second, the malicious user would take about 7 days to try all possible passwords. This is definitely possible, although whether its worth the time and money of the malicious user depends on the value of the information that can be gained by discovering the password.
7.5.4 Pre-calculated Hashes and Rainbow Tables
The above simple example showed it would take about a week for a malicious user to find a password running with a recent GPU. Is it possible to make it even faster (without increasing the hardware capabilities)? Yes, it is. Just get someone else to calculate the hash values for you!
Assume someone has already calculated all hash values. And they conveniently stored the hash value and corresponding password in a database. Then if you have that database, then its just a matter of performing a lookup with the users stored hash value against the set of pre-calculated hash values. Once a match is found, the password is found. The advantage of this approach is that performing a lookup (i.e. comparing one value against another value) is much, much faster than calculating a hash. So although one person took 7 days to calculate all the hash values, other malicious users can then re-use these values, and quickly check a known hash value against the set of pre-calculated values. This can reduce time to password discovery down to 10’s of minutes or hours.
A potential problem with such pre-calculated hash values is the storage requirements. Considered how much raw data needs to be stored if no compression is used. There are entries in a table stored. Each entry consists of a 8 character password (for simplicity, assume each character is 1 Byte) and a 128-bit MD5 hash value. That is at least 146,000 TB. This is not practical.
Of course compression can be used to store the data, but most general purpose compression techniques still would not reduce to a manageable size (a factor of 1000 size reduction would still result in 146 TB). However, using special purpose data structures to store the data is possible. Rainbow tables are one such data structure. I will not attempt to explain how they work (because I don’t know), but in brief rainbow tables are a data structure designing specifically for storing the hash and password. The result is a significant reduction in the total storage space needed. Consider Project RaindowCrack, an effort to pre-calculate the hashes of many possible passwords and distribute them (at a price) to whoever is interested. The have a list of password sets already hashed and stored in rainbow tables, including the md5_ascii-32-95#1-8 set.
The md5_ascii-32-95#1-8 rainbow table contains the MD5 hashes of all combinations of 95 printable ASCII characters, ranging in length from 1 character to 8 characters long. The total number of passwords in this set is:
That is, about the same number as the example above using a set of 94 characters and 8 character passwords only. The raw data set is at least 146,000 TB. But using rainbow tables, the information is stored in 576 GB—thats a reduction in size by a factor of about 250,000. 576GB is a manageable size. In fact they sell this data set for $US1250, delivered in a 3TB hard disk.
So by using rainbow tables, the challenge of storing and distributing the set of passwords and hashes make it much easier/cheaper for a malicious user to quickly find a password, given only a hash. Some example tests by Project RainbowCrack show that if given a hash of a random password, using the above rainbow table it takes between 5 and 30 minutes to find the password.
7.5.5 Salting a Password
Can we make it harder for malicious users that have discovered the hashed password database to use rainbow tables to quickly find passwords? Yes, there are several approaches including:
- Require the users to use longer passwords. A 9 character random password requires almost 100 times more space and time to generate the rainbow table, again becoming much harder for the malicious user to manage. But requiring long, random passwords is inconvenient for users - they most likely not be able to remember such passwords - leading to other security problems.
- Use different hash algorithms/implementations to slow down the calculation rate. If for example hashes could only be calculated at a rate of hashes per second (instead of ), then the time to generate the rainbow table would grow from 1 week to almost 2 years. But this approach doesn’t help for exisiting algorithms (such as the popular MD5).
- Use a salt before hashing the password, as explained below.
Requiring the user to increase their password length makes it harder for malicious users discovering passwords, but is inconvenient for users. An alternative is for the system to effectively increase the users password length by adding random characters to their chosen password. These extra characters are called a salt. When a user account is created, the system chooses a random salt, concatenates it with the password and then hashes the resulting value. So a hash of the password with salt is stored. In addition, the salt is also stored in the password database. For example, with a 5 character salt, our example password database will be:
| username | salt | H(password salt) |
| john | a4H*1 | ba586dcb7fe85064d7da80ea6361ddb6 |
| sandy | U9(-f | 816a425628d5dee17839fffeafb67144 |
| daniel | 5<as4 | 11842ced4203d4067ed6a6667f3f18d9 |
| … | … | … |
| steve | LqM4^ | 184b7f9c6126c568ee50cd3364257973 |
Note that the salt is often measured in bits: our 5 character salt is approximately equivalent to a 32 bit value.
What can a malicious user do? Well they can attempt a brute force attack, trying all possible combinations of passwords. As the salt is stored in the password database, it is known to the malicious user, so it provides no additional security: the malicious user in the worst case still needs to different passwords. Its just that for each password they try they must also concatenate with the salt for the appropriate user. It will still take about 7 days to find the password.
But what if the malicious user wants to use pre-calculated hashes, i.e. rainbow tables? This will no longer work because a rainbow table contains the hashes of passwords without a salt. The malicious user would need to use a rainbow table that contains the correct salt. For example, if trying to find John’s password, a rainbow table must have been pre-calculated using the salt a4H*1. But if trying to find Sandy’s password a rainbow table must have been pre-calculated using a different salt, U9(-f. In general, a separate rainbow would be needed for each possible salt. With a 32-bit salt, then about rainbow tables are needed. The amount of space and time needed to generate the rainbow tables (previously 576GB and 7 days, respectively) have now both been increased by a factor of 4 billion. This is obviously unachievable for the malicious user.
In summary, an advantage of including a random salt before hashing the password is that it makes the use of pre-calculated tables of hashes and passwords (e.g. rainbow tables) ineffective. But note in most cases it does little to prevent a brute force attack, i.e. hasing each password plus salt and comparing with the stored hash value.
7.5.6 Summary and Other Issues
The main conclusion:
When storing user login information, always store a hash of a salted password. Never store the actual password and avoid storing unsalted password hashes.
That is, select a long random salt, concatenate with the users password, calculate the hash of the result using a strong hash function, and store both the salt and hash value.
The above discussion made various assumptions and did not address other important issues about passwords, such as selecting passwords, dictionary attacks, selecting hash algorithms and speed of different hardware. There are many websites and textbooks that discuss this issues further and are worth reading.