Ping Flooding DoS Attack in a Virtual Network
A simple, but effective denial of service attack in computer networks is a ping flooding attack. The idea is that a malicious computer triggers the sending of many Ping messages to a target computer. If enough messages are sent, the link leading the to the target computer is overloaded, thereby denying normal users the ability to communicate with the target. My lecture on Denial of Service attacks for IT Security gives an overview of the concepts of the attack (screencast, slides). Although there are various features in Internet connected devices today that make ping flooding difficult, it is a simple attack to demonstrate the concepts used in many real distributed denial of service attacks. Hence in this article I explain how to perform a ping flooding DoS attack.
Of course you should not perform a DoS attack in a real network, even if just for testing and learning purposes. To demonstrate the attack we will use virtnet, which creates a virtual network using VirtualBox. This allows you to create a small network, with malicious computer, a target, some routers and slave (or more precisely, reflector) computers, all on your own computer. I assume you have already setup virtnet on your computer, and understand basic command line operations in Linux.
There are two initial steps:
Then there are some different tasks to perform and analyse an attack. They include:
- Set a fake source IP address to perform a reflector attack.
- Ping to the entire subnet using, and getting all those on the subnet to reflect to the target.
- Capture packets and view statistics on the target and other nodes to observe what is happening.
- Ping multiple destinations at once using a Shell script.
- Test that the ping flooding attack denies access to a web server on the target.
I don't explain how to use ping in this article. I assume you can use it and understand its operation. Remember the interval (-i) and packet size (-s) parameters can be useful. Another option is -f, which continuously sends ICMP Echo requests. Similarly, I do not give detailed examples of the ping flooding DoS attacks. Rather I provide the setup and tools that you can use. It is your task to then use ping in different ways to flood the target.
Create a Virtual Network
We need a network with at least a malicious computer, a target computer and preferrably several reflectors (that the malicious computer can use on its behalf to attack the target). There are different network topologies you could use. For this demo I will use topology 26, which is shown below:
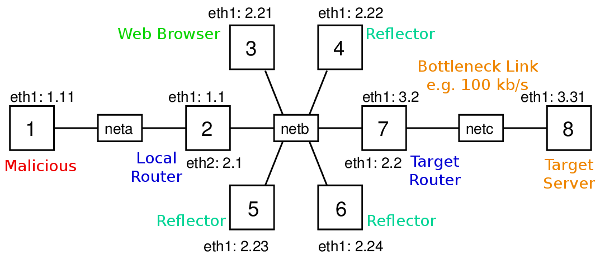
2014-01-31: The diagram above has an error: interface of node 7 with IP address 3.2 should be eth2, not eth1. I will fix the diagram soon.
This topology has 8 nodes across three subnets (nodes 2 and 7 are routers). Recall that with virtnet, all IP addresses start with 192.168., so node 1 has IP 192.168.1.11. For the demo, node 1 (or node 3 in some cases) will be the malicious computer, node 8 will be the target, and nodes 3 to 6 may act as reflectors. Depending on the attack, I will also use node 3 as a malicious computer and/or normal user with a web browser trying to visit the target web server.
(You don't have to use topology 26; others are sufficient to demonstrate the ping attack. You may want to consider others with fewer nodes if your host computer is slow running topology 26. This will mainly depend on the amount of RAM on your host. Each node is allocated 128MB, so 8 nodes consumes at least 1GB. Although it may take some time to create and start the nodes, I guess with 4GB of RAM the 8 nodes will run smoothly).
To create this virtual network topology on your host (real) computer enter the directory containing the virtnet scripts from Subversion. If you installed in svn sub-directory of your home directory, then on Linux you would:
$ cd ~/svn/virtnet/bin/host/
Now create the topology:
$ bash vn-createtopology 26
It may take several minutes to create and configure the 8 Linux virtual machines. Once they are created, you should start all of them. Either use the VirtualBox GUI to start them, or use VBoxManage on the command line, e.g.:
$ VBoxManage startvm --type headless node1
Waiting for VM "node1" to power on...
VM "node1" has been successfully started.
Now login to the nodes, either using the VirtualBox GUI or using secure shell. See instructions for accessing VirtualBox guests for further information.
$ ssh -p 2201 -l network localhost
network@localhost's password: network
Welcome to Ubuntu 12.04.3 LTS (GNU/Linux 3.8.0-29-generic i686)
...
Setup Nodes and Links: sysctl and tc
Set the Capacity of the Link to Target
A ping flooding DoS attack aims to overflow a link leading to the target, so data from normal users to the target will be dropped or significantly delayed. Overflowing a link means sending enough data across the link such that the full link capacity is utilized. In real-life, the link from the target network to their ISP, or a link within the target network, is that which is underattack. If the link has a high capacity (multiple Gb/s), then to utilize the capacity, thousands of computers must be sending data at a very high rate towards the target. Slaves, reflectors and amplification are usually required.
In our virtual network we only have several nodes. Therefore to overflow the link to the target (from router node 7 to target node 8), we need the capacity of that link to be quite low. But what is the capacity of the link (or for that matter, any links in the virtual network)? VirtualBox emulates the network links, but by default doesn't set a link capacity or date rate. The speed at which two virtual nodes can exchange data across a link varies, and depends on factors such as host CPU, disk and the driver used for the virtual network interfaces. Therefore we need to explicitly set the link capacity, at least between node 7 and node 8. To do so, we will use a Linux traffic control program, tc. You can use tc to emulate link characteristics like data rate (capacity), delay, jitter and packet drops. Here I just give the commands for setting the link rate, with little explanation. I have some other examples for setting the delay, jitter and packet drops.
tc operates on the outgoing link, and therefore to set the capacity of the link in both directions between node 7 and 8, we need to apply the commands on both nodes. For the demo we will set the capacity to 100,000 bits per second (100 kb/s). This is low enough such that we can easily overflow with a few nodes sending pings. First node 7:
network@node7:~$ sudo tc qdisc add dev eth2 root handle 1:0 htb default 10
network@node7:~$ sudo tc class add dev eth2 parent 1:0 classid 1:10 htb rate 100000
And now node 8 (the only difference between the commands on the nodes is the interface, eth2 on node 7 and eth1 on node 8):
network@node8:~$ sudo tc qdisc add dev eth1 root handle 1:0 htb default 10
network@node8:~$ sudo tc class add dev eth1 parent 1:0 classid 1:10 htb rate 100000
(If you need to change the link capacity, or remove the limitation, then an easy way is to delete the "class" and "qdisc" and then try again. To delete, simply run the same command but replacing the word "add" with "del". The last value on the second command is the capacity in bits per second. You can also use other prefixes.)
Turn Off Security Features in the Linux Kernel
The Linux kernel includes features to prevent (or at least make very difficult) ping flooding attacks. Therefore to see the attack in action, we need to disable these security features. You don't have to do these on all nodes, although it won't matter if you do.
First, when acting as a router, the Linux kernel does not allow packets originating from one of its subnets, but with a fake source address, to be forwarded to another subnet. The feature is called Reverse Path Filtering. We need to disable this feature on the routers in the network (nodes 2 and 7). Do this by turning off the rp_filter kernel parameter for both eth1 and eth2 and all interfaces on each router. You will need to restart networking for the parameter change to take effect.
network@node2:~$ sudo sysctl net.ipv4.conf.eth1.rp_filter=0
net.ipv4.conf.eth1.rp_filter = 0
network@node2:~$ sudo sysctl net.ipv4.conf.eth2.rp_filter=0
net.ipv4.conf.eth2.rp_filter = 0
network@node2:~$ sudo sysctl net.ipv4.conf.all.rp_filter=0
net.ipv4.conf.all.rp_filter = 0
network@node2:~$ sudo /etc/init.d/networking restart
Remember to repeat the above commands on node 7 as well.
Next, in some attacks, you may want one node to ping the broadcast address, so the ping is sent to all nodes in the subnet. However the Linux kernel is configured to ignore ping broadcasts (i.e. not reply to Echo requests to the broadcast address). We need to accept these ping messages, at least on the nodes in the same subnet as the source. For the demo of ping broadcast, I will use node 3 to broadcast to the subnet, including nodes 4, 5 and 6. Therefore at least on nodes 4, 5 and 6 you should turn the icmp_echo_ignore_broadcasts kernel parameter off. You may turn it off for other nodes as well - it won't hurt.
network@node4:~$ sudo sysctl net.ipv4.icmp_echo_ignore_broadcasts=0
net.ipv4.icmp_echo_ignore_broadcasts = 0
Remember to repeat the above command for nodes 5 and 6 (and others, if desired).
As an aside, a good place to find a description of all the Kernel network parameters that you can control with sysctl, including rp_filter and icmp_echo_ignore_broadcasts, is the Linux Kernel documentation.
Using a Fake Source Address: iptables
With the virtual network created, link capacity set to 100 kb/s and security features turned off in the Linux kernel, you can now start performing ping flooding attacks. Try pinging from the malicious computer (node 1) to the target (node 8). Can you overflow the link capacity with pings? (To measure and observe what is happening the network you can use tcpdump and iptraf. To test whether your flooding attack denies service, you can try access the web server on the target.)
One useful capability in a ping flooding attack is for the malicious node to use a fake source address. I have a detailed example of address spoofing in Linux, but for now, lets just show how to do it. On the node that you want to use a fake source address, e.g. node 1, use iptables as follows.
network@node1:~$ sudo iptables -t nat -A POSTROUTING -p icmp -j SNAT --to-source 192.168.3.31
The above command will set the source address of all ICMP packets sent by node 1 to 192.168.3.31 (the target IP address). If you want the fake address to be applied to all packets sent, then remove the -p icmp option. To stop using the fake address, delete the rule by running the same command but replacing -A with -D. See my examples for further details.
Ping to Entire Subnet using Directed Broadcast
One method to increase the amount of data sent to the target is to get multiple nodes to send ping messages to the target on behalf of the malicious node. By using a fake source address set to the targets IP, the malicious node can ping other nodes, who will then all reply to the target (since the source of the ICMP Echo request was that of the target). I give an example of the malicious node individually ping'ing multiple nodes in parallel below. Another way is to ping the directed broadcast address for a subnet, which in theory, causes the ping to be delivered to all nodes in a particular subnet. I say "in theory" because in practice, many systems restrict this behaviour precisely because it makes ping DoS attacks very easy. Previously we turned off the Linux kernel feature that stopped nodes replying to pings to a broadcast address. So from one node we can have a ping delivered to all nodes in the same subnet, and those nodes will all reply. Lets try that.
For this task, assume node 3 is the malicious node. Set a fake source address for node 3, e.g. that of the target, and then ping to node 3's subnet's directed broadcast address, 192.168.2.255.
network@node3:~$ sudo iptables -t nat -A POSTROUTING -p icmp -j SNAT --to-source 192.168.3.31
network@node3:~$ ping -b 192.168.2.255
If you catpure on nodes 4, 5 and 6, then you should see them all receive the ICMP Echo request. And because the source address of these ICMP Echo request packets is 192.168.2.255, nodes 4, 5 and 6 should all send a ICMP Echo reply to the target.
A better attack would be for a malicious node to send a directed broadcast to another subnet. For example, if node 1 is the malicious node, it pings 192.168.2.255, with the intention of nodes 3, 4, 5 and 6 all receiving the ICMP Echo request and replying to the target. Unfortunately (for the attacker) the Linux kernel does not allow a router to forward packets which have a directed broadcast address as a destination. So node 1 would send the ICMP Echo request to node 2, but as a router, node 2 would automatically drop the packet. Nodes 3, 4, 5 and 6 will not receive the request. Again, this is a security feature in the Linux kernel to make ping flooding attacks difficult. Unfortunately (for our demo) I don't know of any way to turn off this feature (I think it is hardcoded into the Kernel source code). If someone knows how to turn it off, please leave a comment.
Capturing Traffic and Viewing Statistics: tcpdump and iptraf
To observe packets being sent and received on nodes in your network, use tcpdump. As we are mostly dealing with ICMP packets, it is often sufficient to let tcpdump to display packet summary information on the command line (rather than writing to a file). For example, for node 7 to display ICMP packets it sends/receives:
network@node7:~$ sudo tcpdump -i eth1 'icmp'
If you want to inspect the packets in detail, you could add the -w file.cap option to write to a file, and then copy that file to your host computer and open in Wireshark. There are several ways for you to access files on the nodes (guests) via your host operating system. (Remember that the nodes only have a command line; there is no GUI and therefore no Wireshark).
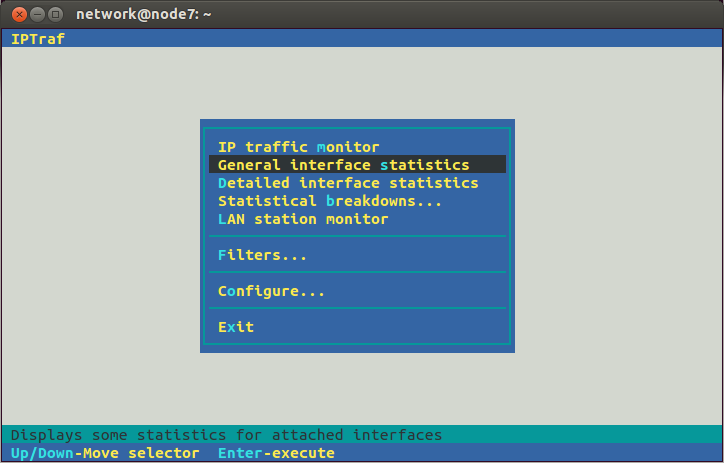
Another way to observe what is being sent through the network is to use iptraf. This provides statistics of the network usage, e.g. bits per second sent across links/interfaces. You could for example run it on node 7 to see how much data is being sent to it, and how much of that is being sent from node 7 to the target. To start run:
network@node7:~$ sudo iptraf
You will see a "graphical" interface that you can use with your keyboard to control. One approach to see traffic coming into node 7 from the other nodes (eth1) and out of node 7 to the target (eth2) is to select General interface statistics from the menu.
Then you should see the rate at which data as passing through node 7, e.g.:
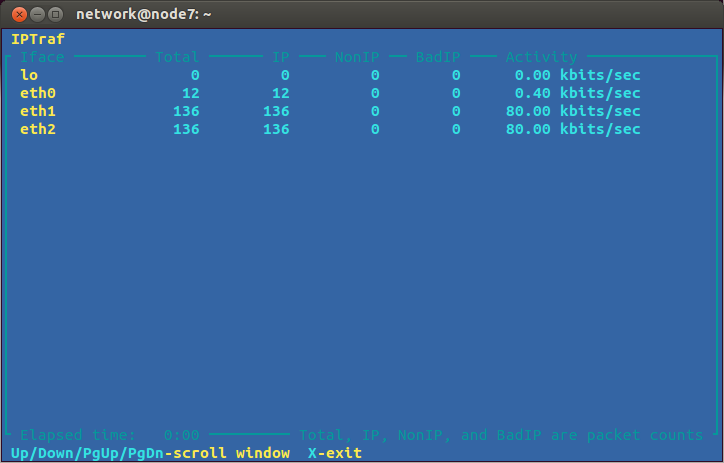
You can then observe whether the ping flooding attack is successful: is it utilizing the 100 kb/s capacity of the link from node 7 to node 8?
Pinging Multiple Destinations with a Shell Script
We saw that Linux (and other systems) has security features to limit the use of pinging to a broadcast address. However the malicious node can still ping many individual nodes to perform an attack. For example, with node 1 as the malicious node, it can ping nodes 3, 4, 5 and 6 at the same time, causing them all to send ICMP Echo replies to the target. In our virtual network you simply run ping one time for each node you want to ping.
To automate the ping'ing of multiple nodes at the same time I have created a Bash shell script. It is quite simple and limited, but it works for this demo. The script is below. Copy the contents and save it to a file on the malicious node (e.g. node 1), with the file called pingmany in the home directory.
#!/bin/bash
# Ping multiple destinations at once
args=$#
interval=$1
shift;
pktsize=$1
shift;
for (( i=3; i<=$args; i++ )); do
        ping -i $interval -s $pktsize $1 > /dev/null &
        shift;
done
It will be convenient if you set the file to be executable:
network@node1:~$ chmod u+x pingmany
Now to get node 1 to ping multiple nodes at once, run the script. The first two parameters it takes are the ping interval (same as the -i option for ping) and the ping packet size (same as the -s option). The subsequent parameters are the IP address of the nodes you want to ping. So to send 972 Bytes of data in each ICMP Echo request, at a rate of 2 pings per second, to nodes 3, 4, 5 and 6:
network@node1:~$ ./pingmany 0.5 972 192.168.2.21 192.168.2.22 192.168.2.23 192.168.2.24
(972 Bytes was chosen so the eventual IP datagram size is 1000 Bytes. 2 pings per second is achieved with an interval of 0.5 seconds.)
The script runs ping in the background and does not produce any output. On the malicious node you will not see any feedback (of course you should see the attack on the target node). To stop the ping you need to kill each process. The easiest way is to send the interrupt signal to each process that contains the word "ping":
network@node1:~$ kill -SIGINT `pgrep ping`
Denial of Service on a Web Server
The purpose of a ping flooding attack is to deny other normal users access to the target. To see this, setup a simple website on the target node, then on another node (e.g. node 3) try and access the website while the attack is in progress. If the attack is successful, the website should be inaccessible or at least very slow to respond. (Of course it would be better if the normal user was not running the web browser on a node involved in the attack, but it is sufficient for demonstrating the denial of service in our small virtual network).
To setup a website on the target node you first need to start the Apache web server (it is already installed, but by default is turned off):
network@node1:~$ sudo apache2ctl start
(Ignore the warning message about the host name.)
Now create a simple website in the web directory /var/www/. That is, create several files with HTML in the web directory, maybe with links between them and optionally some images. (You need to use sudo to create files in /var/www/).
Now that your web site is setup, you need a browser on node 3 to access it. There are two options: lynx via the command line or Firefox (or other graphical browser) on your host computer, connecting via proxy and SSH tunnel to node 3. Using lynx is easy - just supply it with the target URL:
network@node3:~$ lynx http://192.168.3.31/
You can traverse through links on a page with Up/Down arrows on your keyboard, and follow a selected link with the Right arrow. Left arrow to go back and q to quit.
If you want to try with Firefox (or similar) on your host computer, then you need to setup a SSH tunnel from your host to node 3, and then configure Firefox to use that SSH tunnel as a proxy. I have an example of doing this here. Once it is setup, just enter the target URL into your browser, e.g. http://192.168.3.31/, and browse the target web site.
Now do a test: observe the response time of your browser when there is no ping flooding attack, and then start the attack and try to access the web site again (make sure the pages are not cached, i.e. reload them). If your attack is successful, you should notice a very slow response from the web server. You have denied a normal user access to the target web site.
Closing Notes
I hope this article has allowed you to perform a simple ping flooding attack on your own virtual network. The purpose is not for you to now go and perform an attack on a real network. Rather it is to illustrate some of the basic techniques of denial of service attacks so that you can be aware how they work, such that you can configure networks to reduce the chance of someone attacking you in the future.
The attacks demonstrated in this article are quite basic, and will be quite hard to be successful in real networks, partly due to the security features built in to many operating systems and network devices (we saw several in the Linux kernel). However other attacks, often using different protocols (e.g. DNS, NTP) but similar concepts are possible, and continue to be carried out. I have some instructions for adapting this ping flooding attack to a more realistic NTP server attack. Your next step should be to investigate recommended ways to configure your network and servers to reduce the impact of DoS attacks.
PDF version of this page, 21 Jan 2014
Created on Tue, 21 Jan 2014, 7:43pm
Last changed on Mon, 03 Nov 2014, 11:05am